A Simple Podcast Set Up for Pro Results
So you want to start a podcast? Good news: you don't need a professional recording studio or a massive budget to get going. A simple podcast set up can get you surprisingly great audio quality right out of the gate.
The trick is to start lean. Focus your energy on creating incredible content, not getting bogged down by complicated gear you don't need yet.
The Simple Podcast Blueprint
Choosing a minimalist approach isn't about cutting corners; it's a strategic move. It lets you test your concept, find your voice, and start building an audience without a hefty upfront investment.
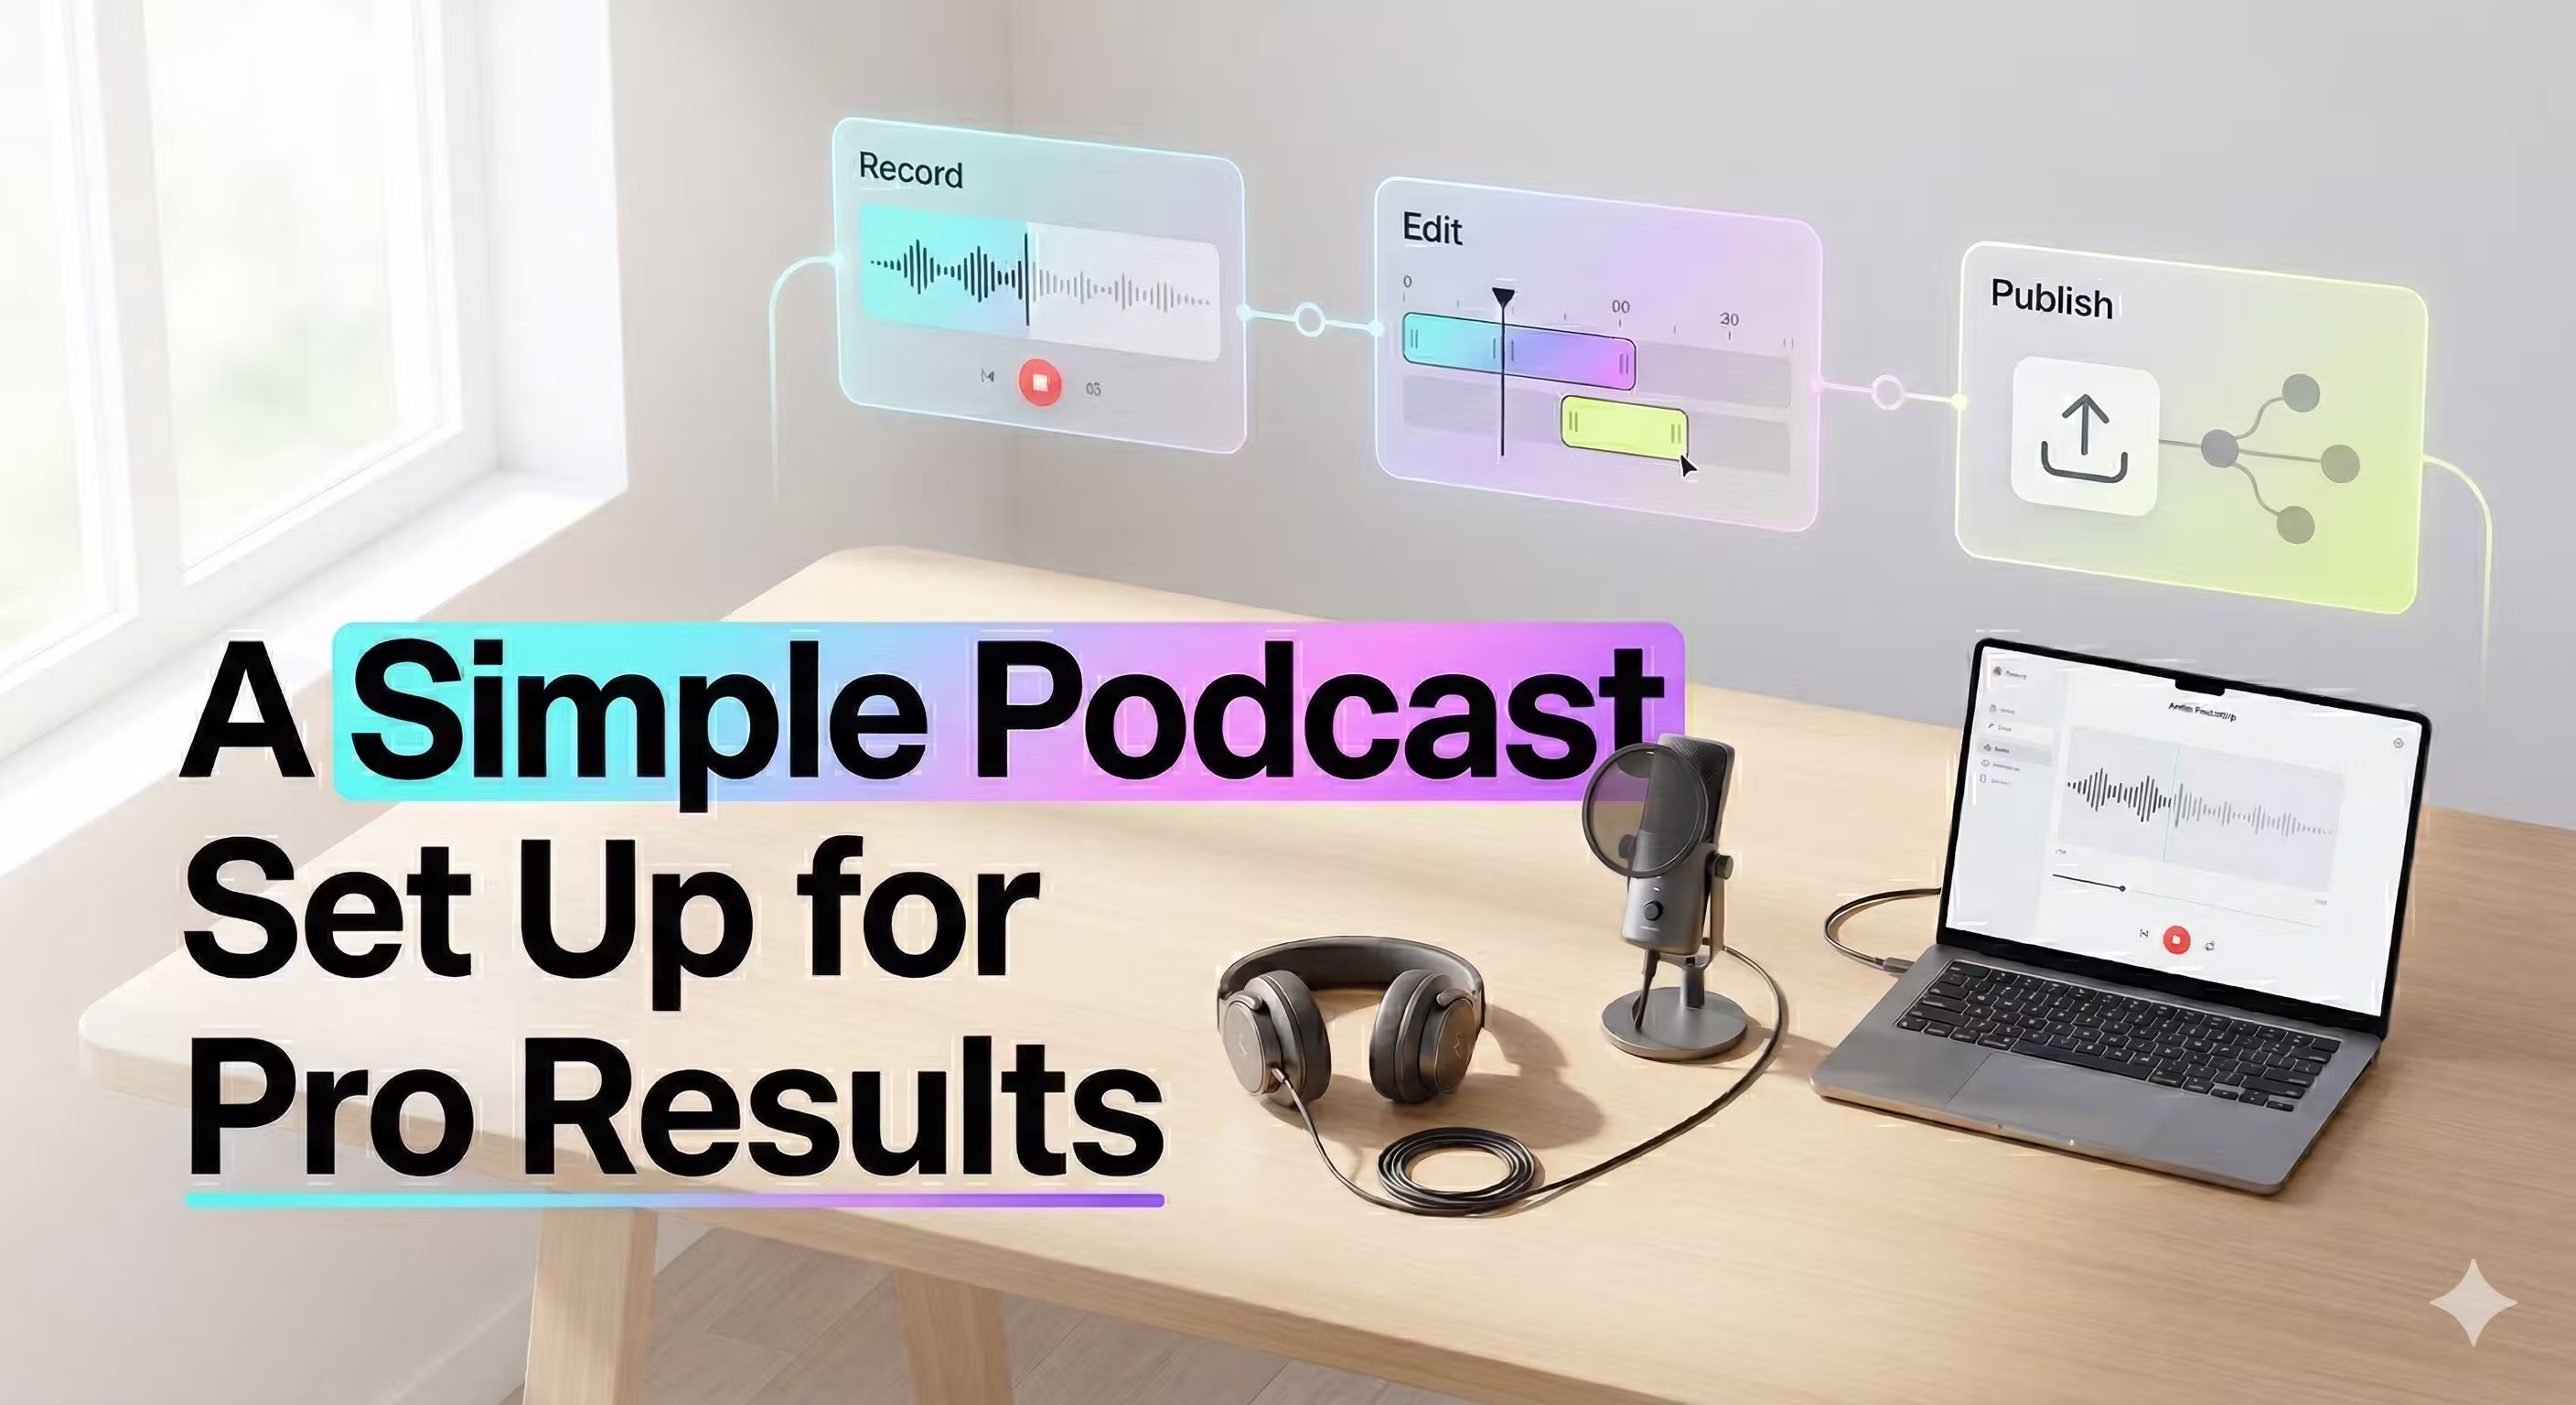
And honestly, with the user-friendly tools available today, it’s never been easier to get your message out there. The entire workflow really just breaks down into three key stages.
It’s a simple, repeatable cycle: record your audio, clean it up in the edit, and then publish it for the world to hear. That's it.
Why Starting Simple Is The Smartest Move
The number one mistake new podcasters make is overcomplicating everything from the start. They fall down a rabbit hole of gear reviews and website themes instead of just hitting "record."
As one industry vet put it after moving his popular podcasting resource site to a simpler platform, complex tools can be a huge distraction.
The goal isn't to build the most feature-rich website possible. The goal is to grow your podcast and media brand. Choose the platform that helps you do that, not the one that gives you the most ways to procrastinate.
Source: Why We're Moving Back to Ghost, The Podcast Setup.
This hits on a core truth for any creative project: constraints breed productivity. A simple setup forces you to focus on what actually matters—your content and your audience.
The Absolute Essentials
For a basic but powerful setup, you only need a handful of things to capture great audio (and video, if you're going that route). The beauty of this approach is that you can always upgrade or add more gear later as your show grows.
Here's a quick look at the absolute essentials for a simple podcast set up. This shows how little you actually need to get started with quality recording.
The Minimalist Podcast Starter Kit
ComponentWhat You NeedWhy It's EssentialMicrophoneA quality USB microphoneThis is the heart of your setup. It captures your voice, and a good one makes a huge difference.HeadphonesAny pair of closed-back headphonesCrucial for monitoring your audio as you record. It helps you catch issues like echo or background noise in real-time.SoftwareFree recording & editing softwarePlenty of powerful, user-friendly, and free options exist to handle both recording and editing your audio.EnvironmentA quiet, non-echoey spaceThis is the most overlooked—and completely free—part of getting great sound. A closet full of clothes works wonders!
With these four things, you have everything you need to record a professional-sounding podcast. It really is that straightforward. You can always add mixers, boom arms, and fancy plug-ins down the road. But for now? This is your launchpad.
Choosing Your Core Podcasting Gear
Alright, you’ve decided on your podcast’s goals and format. Now comes the fun part: the gear. It's incredibly easy to fall down a rabbit hole of gear reviews, but we're going to cut through that noise.
For a simple, reliable setup, you only need to focus on two things: your microphone and your headphones. Getting these right from the start is the key to sounding professional without breaking the bank.
The Microphone: The Heart of Your Sound
Your microphone is the single most important piece of equipment you will buy. Full stop. It’s what translates your voice into a recording, and a bad mic will give you thin, noisy audio that no amount of editing wizardry can truly fix.
For anyone just starting out, a USB microphone is the clear winner. They plug directly into your computer, are dead simple to use, and require no extra hardware.
There's a reason new podcasters overwhelmingly lean towards USB mics. Recent data from The Podcast Host's 2026 survey on podcasting gear preferences shows that today's entry-level mics, like the workhorse Audio-Technica ATR2100x-USB (around $99), pack features that used to be reserved for pro-level gear.
Why a Hybrid Mic is a Smart Investment
The smartest move a new podcaster can make is to grab a hybrid microphone—one that has both a USB and an XLR connection.
- USB Connection: This is your plug-and-play solution. Perfect for getting started right away with minimal fuss.
- XLR Connection: This is the professional standard used with audio interfaces and mixers. Having this port means your mic is ready for when you are.
This dual-connectivity is all about future-proofing your purchase. You can start with the simplicity of USB today, but when you decide it's time to upgrade to a more advanced setup, you won't have to buy a new microphone.
Key Takeaway: A hybrid mic like the Audio-Technica ATR2100x-USB gives you the best of both worlds. It’s easy enough for day one and flexible enough for year three.
Most of these mics are also "dynamic" and feature a cardioid pickup pattern. Think of it as a spotlight for sound—it captures what’s directly in front of it (your voice) while ignoring noise from the sides and back. This is huge for recording in a normal room, as it dramatically cuts down on echo and background chatter.
We've got more mic suggestions in our guide on recommended microphones for podcasting.
Headphones: The Unsung Hero
While the microphone gets all the attention, a good pair of headphones is non-negotiable. They let you hear exactly what your mic is picking up in real time, which is critical for catching issues before they ruin a take.
You specifically need closed-back headphones. These create a seal around your ears, which does two very important things:
- They block out ambient room noise so you can focus on the audio from your mic.
- They prevent the sound from your headphones from leaking out and getting picked up by your microphone, which would create a nasty echo.
You don't have to spend a fortune here. A solid pair of studio monitoring headphones will give you a true, accurate picture of your sound without any artificial bass boost, helping you make better decisions when you get to editing.
Selecting Your Recording And Editing Software
You've got your mic and headphones. Now for the software—the digital brain of your simple podcast set up. This is where you'll capture your audio and polish it into a final episode. Thankfully, getting great results is more accessible than ever.
The right software is the bridge from your raw recording to a polished, professional-sounding show. Years ago, this meant a complex digital audio workstation (DAW), but that’s no longer the case. The core setup has been streamlined to a mic, headphones, and a computer. As the team over at Riverside points out, that trio is really all you need to get started, especially with cloud-based tools that handle remote guests without any clunky hardware.
This means you can skip the expensive, intimidating software and pick a tool that feels right for you.
Free And Powerful Options For Editing
If you're just starting out or working with a tight budget, free software is surprisingly powerful. The undisputed king of free audio editing is Audacity. It’s been a go-to for podcasters for years for a good reason.
Audacity gives you all the essentials without costing a dime:
- Recording: Capture high-quality audio straight from your USB mic.
- Editing: Snip out mistakes, cut long pauses, and move segments around with ease.
- Basic Mixing: Adjust volume levels for different speakers and add your intro and outro music.
Sure, it has a bit of a learning curve, but its power is unmatched for a free tool. If you need a hand getting started, we put together a guide on editing a podcast in Audacity to walk you through the basics.
All-In-One Recording And Editing Platforms
Planning on interviewing remote guests? This is where all-in-one platforms like Riverside or Buzzsprout really shine. These services are built from the ground up for podcasters.
They solve the single biggest headache of remote recording: unreliable internet connections. Instead of recording the choppy audio from a video call, these platforms record each person's audio locally on their own computer. The result? You get a separate, studio-quality audio file for every speaker, even if the call itself was glitchy.
Key Takeaway: For remote interviews, a dedicated recording platform is a game-changer. It eliminates the risk of call dropouts ruining your audio and provides separate, high-quality tracks for much easier editing.
These platforms often wrap recording, editing, and even transcription into one clean package. While most have a monthly subscription, the time saved and the quality gained are often well worth it. Your choice really comes down to this: the hands-on control of a free tool like Audacity or the streamlined convenience of a paid, all-in-one service.
Mastering Your Recording Environment And Technique
Look, you can have the most expensive microphone on the market, but if your recording space sounds like a cavern, your audio will be a disaster. Empty rooms with hard surfaces—think bare walls, hardwood floors, big windows—are a podcaster's worst enemy.
They create echo and reverb, making your voice sound thin, distant, and frankly, unprofessional.
The good news? You don't need a pro-level soundproof booth. The real goal is to simply dampen sound reflections, and you can get there with things you already have lying around the house. Think soft.
A room with a carpet is a huge head start. Add in some heavy curtains, a plush couch, or even a messy bookshelf, and you’re already making a massive difference. You're breaking up and absorbing those sound waves before they can bounce back into your microphone.
Fine-Tuning Your Room For Free
Your mission, should you choose to accept it, is to create a "dead" space where the mic only hears you, not the room. Here's how to radically improve your sound without spending a dime:
- Record in a walk-in closet. Seriously. A closet packed with clothes is the perfect DIY vocal booth. All that fabric is a master at soaking up sound.
- Hang blankets. No closet? No problem. Drape a few heavy blankets or comforters on the walls around your desk. It’s a temporary fix with permanent-sounding results.
- Use pillows and cushions. Scatter pillows on your desk, on the floor, and on any nearby flat surfaces. Every soft item you add helps kill more stray reflections.
These tricks are the heart of a simple podcast set up. It’s about being resourceful, not rich.
Perfecting Your Microphone Technique
Once your space is sorted, it's time to focus on how you're using the mic. This is just as critical as the room itself.
Even with a budget setup, placement is everything. You can get incredible results from a minimalist podcast setup, with some pros recommending a solid two-item rig for around $70. Even with that approach, how you position the microphone is non-negotiable. Experts on Buzzsprout even have guides on building a starter kit that emphasize this.
For most dynamic mics, the sweet spot is about 4-6 inches away from your mouth. An easy guide? Make a "shaka" sign with your hand—the distance from your thumb to your pinky is roughly what you're aiming for. This gives you that clear, present vocal sound without picking up every little breath and pop.
Pro Tip: Stop talking directly into the front of the microphone. Instead, position it at a slight 10-45 degree angle to your mouth. This simple adjustment does wonders to reduce plosives—those harsh "p" and "b" sounds—and can even add a touch of warmth to your voice.
Finally, watch your volume. Keep your speaking level consistent. This isn't the time for dramatic whispers and shouts. A steady delivery saves you hours of headaches in the editing phase.
Great audio is about smarts, not money. It's all in the technique.
Your Simple Publishing And Distribution Checklist
Hitting 'record' is a huge milestone, but your work isn't done. The final stretch—getting your episode from a raw file to your listeners' favorite app—is a critical part of a simple podcast set up that many beginners get wrong.
Before you can share your masterpiece, it needs some polish. Don't worry, this post-production phase doesn't have to be complicated. It's all about making your audio clean, professional, and easy to find.
Finalizing Your Audio File
First up is a basic audio cleanup. This is where you'll edit out any mistakes, awkward pauses, or background noise that slipped through during recording. Once your core content is tight, you can layer in your intro and outro music.
When you're ready to export, the file format is key. The industry standard is an MP3 file. Why? It hits the sweet spot between sound quality and file size, meaning your episodes will download quickly, even for listeners on the move. According to a 2024 analysis by podcast hosting platform Transistor.fm, MP3s remain the dominant format due to their universal compatibility and efficient compression.
(Source: Transistor.fm, "The Podcaster's Guide to Audio Formats")
Choosing A Podcast Host
Your polished MP3s need a place to live online, and that's where a podcast host comes in. This is a common point of confusion—this is not the same as your website host.
A podcast host is a specialized service built to store your large audio files and generate an RSS feed.
Think of the RSS feed as the magic key to getting your show everywhere. It's a single, unique link that holds all your podcast's info: title, cover art, and every single episode. You'll submit this one link to all the major podcast directories.
Key Takeaway: You only upload your episode to your podcast host once. The host then automatically pushes it out to every directory where your show is listed, like Apple Podcasts and Spotify.
Preparing For Launch
With the technical side sorted, your final job is to create the assets that convince someone to actually press play.
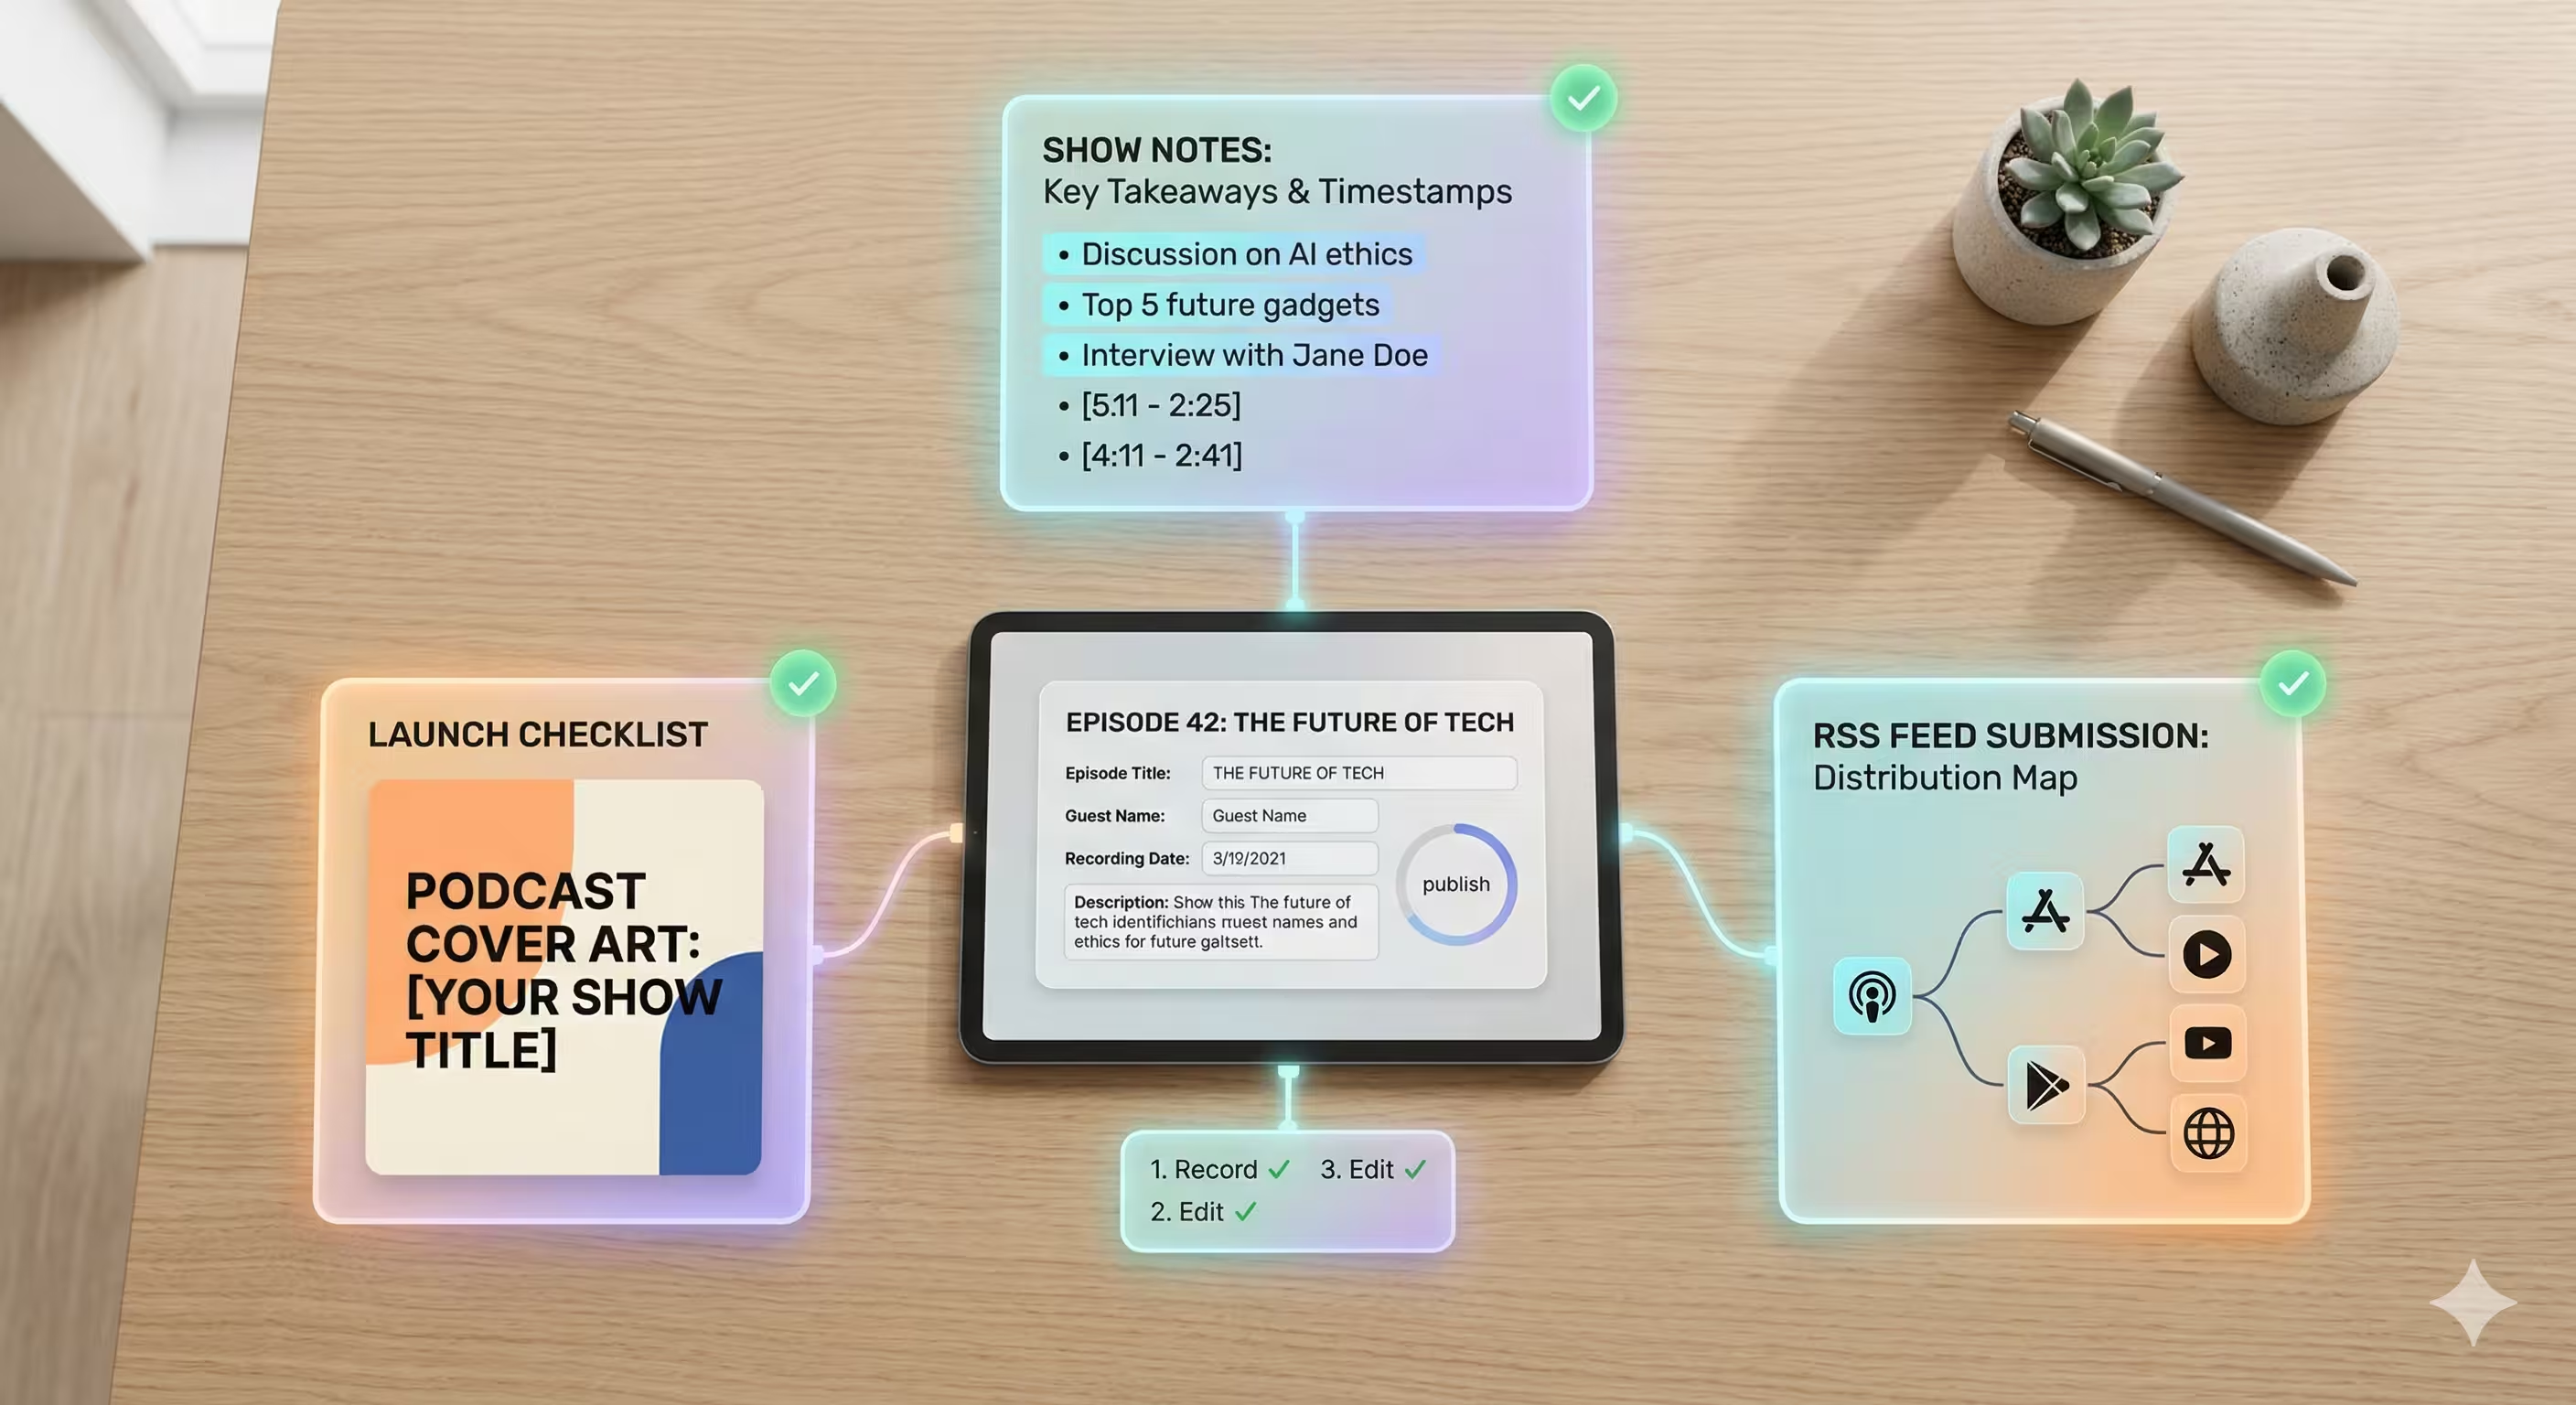
Here’s your essential checklist:
- Compelling Show Notes: Write a short, punchy summary of the episode. What topics did you cover? Who was your guest? What links did you mention? This helps with search discovery and gives potential listeners a clear reason to tune in.
- Eye-Catching Cover Art: Your cover art is your show's first impression. Make sure it's clear, reflects your brand, and is still readable as a tiny thumbnail on a phone screen.
- Submit Your RSS Feed: Grab that RSS feed from your host and submit it to Apple Podcasts, Spotify for Podcasters, Google Podcasts, and any other major directories. For most platforms, this is a one-time setup.
Once these pieces are in place, you're ready to publish. Following this checklist turns your raw recording into a polished, professional, and discoverable episode—completing your simple podcasting workflow.
When To Move Beyond A Simple Setup
A simple podcast set up is your best friend when you're just starting out. It gets you in the game, focusing your time and energy on what really matters: your content. But eventually, your ambitions will outgrow that starter kit. It’s a good problem to have.
How do you know when it’s time? You start feeling the growing pains.
Are you scrambling to keep up with a weekly release schedule? Do you want your YouTube presence to look like a pro broadcast, not just a grainy webcam feed? Are you spending more time chopping up social media clips than you are actually planning your next great conversation?
Those are the signals. They mean you're succeeding, but they also mean it's time to think about your next move.
Scaling Your Production Quality
When your podcast becomes a key part of your brand or business, "good enough" just doesn't cut it anymore. Leveling up isn't just about buying a fancier camera; it's about mastering skills you might not have the time to learn. For more complex recordings with multiple guests or instruments, for example, you'll want to explore an audio interface. Our guide on choosing an audio interface for podcasting breaks down when and why you'd make that jump.
This is the point where bringing in a production partner can completely change the game. Imagine handing off the entire technical side of things to a dedicated team that lives and breathes this stuff.
A production partner handles the operational complexities, freeing you to focus exclusively on creating compelling content. It shifts your role from technician to true creator.
The Benefits Of A Production Partner
For busy founders, marketing teams, and executives, the ROI is undeniable. A partner can manage everything from guided remote recording sessions (making sure every guest looks and sounds incredible) to a full multi-camera video edit.
They take care of the details that separate an amateur show from a professional one:
- Professional editing with high-end color grading and sound design.
- Custom motion graphics and branded intros/outros.
- Strategic repurposing of your episode into dozens of short-form videos for social media.
- Full channel management, including publishing, scheduling, and optimizing for discovery.
Growing beyond a simple setup doesn't mean you have to do it all yourself. It means finding the right support to build a high-impact show that gets results—without the production headaches.
Common Questions About Simple Podcast Setups
Even the simplest podcast plan can bring up questions. It's totally normal. We get these all the time from creators just starting out, so let's clear up a few common hurdles.
Do I Need A Mixer For A Simple Two-Person Podcast
For a straightforward two-person show, the answer is almost certainly no.
Mixers were once a non-negotiable piece of kit for managing multiple mics, but today’s tech gives you much simpler, more direct paths to great audio. A mixer just adds a layer of cost and complexity you don't need right now.
Instead, focus on one of these two far more efficient setups:
- Two separate USB microphones plugged directly into your computer. Most recording software can easily handle multiple inputs.
- A dual-input audio interface with two XLR microphones. This gives you a clean, high-quality signal without the learning curve of a full mixing board.
Key Takeaway: Skip the mixer for a basic two-person recording. Put that budget toward two good USB mics or a simple audio interface instead—you'll get better results with less hassle.
What Is The Best Way To Record A Remote Guest
Hands down, the best way is using a dedicated cloud-based recording platform. Tools like Riverside or Squadcast were built to solve the single biggest headache of remote interviews: glitchy internet connections.
Here’s how they work: instead of recording the choppy audio from a live video call, these platforms record each person's audio and video locally on their own computer.
After the call, you get separate, studio-quality tracks for every participant. This means your guest sounds incredible, even if the connection dropped out a few times during the conversation. It's a game-changer.
Can I Start A Podcast With Just My Phone
Absolutely. The microphone in a modern smartphone is surprisingly capable, and you can get a very decent sound if you know how to use it.
The key is to treat your phone like a real microphone, not just a phone.
First, find a quiet space with soft furnishings. A walk-in closet filled with clothes is a classic for a reason—it kills echo. Then, hold the phone a consistent 4-6 inches from your mouth and speak directly toward the bottom, where the mic is. The default voice memo app on most phones is all you need to get started.
Feeling overwhelmed with scaling your production? micDrop offers end-to-end video podcast production, freeing you to focus on creating great content while we handle the rest. Explore our services and see how we can elevate your show at micDrop.


