Premiere Pro Subtitles: Your Complete 2026 Workflow
You publish a strong episode. The lighting is clean, the guest is sharp, the edit moves well, and the clip should work across YouTube, LinkedIn, and short-form social.
Then it underperforms the moment it leaves your editing timeline.
A big reason is often simple. No subtitles, weak subtitles, or subtitles that were added as an afterthought. In practice, that means viewers scroll past muted previews, mobile users miss context, and internal stakeholders notice that the video feels less polished than the rest of the brand system.
For producers, premiere pro subtitles are no longer a finishing task you squeeze in at the end. They are part of the core edit. If the transcript is messy, the cut feels messy. If the caption styling is off-brand, the whole piece looks cheaper than it should. If the export choice is wrong, the platform does not use the captions the way you expected.
The good news is that Premiere Pro has matured into a serious captioning tool. The better news is that a smart workflow gets you speed without giving up quality. That matters most for podcasts, executive interviews, product explainers, and recurring B2B series where volume and consistency matter as much as craft.
Why Your Video Content Needs Subtitles Now
A lot of teams still treat captions as a compliance checkbox. That mindset leaves performance on the table.
Captioned video does more than help with accessibility. It makes content easier to consume in muted environments, easier to follow when audio is less than perfect, and easier to reuse across channels where autoplay starts with the sound off. For brand teams, that changes how much value you get from every shoot day.
Captioned content on platforms like YouTube achieves 12% longer average view duration and 40% higher completion rates compared to non-captioned videos, according to the source material behind Adobe-focused workflow guidance in this Premiere Pro captions walkthrough on YouTube. Those are not vanity metrics. They directly affect whether your episode earns attention after publish.
Subtitles support performance, not just accessibility
A polished talking-head clip without subtitles often fails in the first few seconds. People may understand the subject if they turn the sound on, but many never get that far.
Subtitles solve three practical problems at once:
- Muted viewing: Social and mobile audiences often first encounter muted video.
- Message clarity: Captions preserve meaning when names, jargon, or accents would otherwise get lost.
- Content reuse: One captioned master edit is easier to adapt into clips, snippets, and platform-specific versions.
That is why subtitles belong in the production plan, not in a last-minute export scramble. Teams building repeatable branded shows should also think about captions as part of a broader content system, especially when one recording session feeds many assets across channels. A useful reference point is this guide to content creation for brands, because the caption workflow works best when it sits inside a larger repurposing plan.
Subtitles also affect how polished your brand feels
Executives notice caption quality even when they cannot explain what feels off. Bad line breaks, timing that lags behind speech, and captions that cover lower thirds all make a video look unfinished.
Producer tip: If your brand spends heavily on filming, editing, sound, and design, weak subtitles can still make the final output feel low-budget.
For podcasts and interview-led content, subtitles are among the most impactful production decisions you can make. They improve reach, they improve usability, and they make your best content easier to watch in the conditions where audiences encounter it.
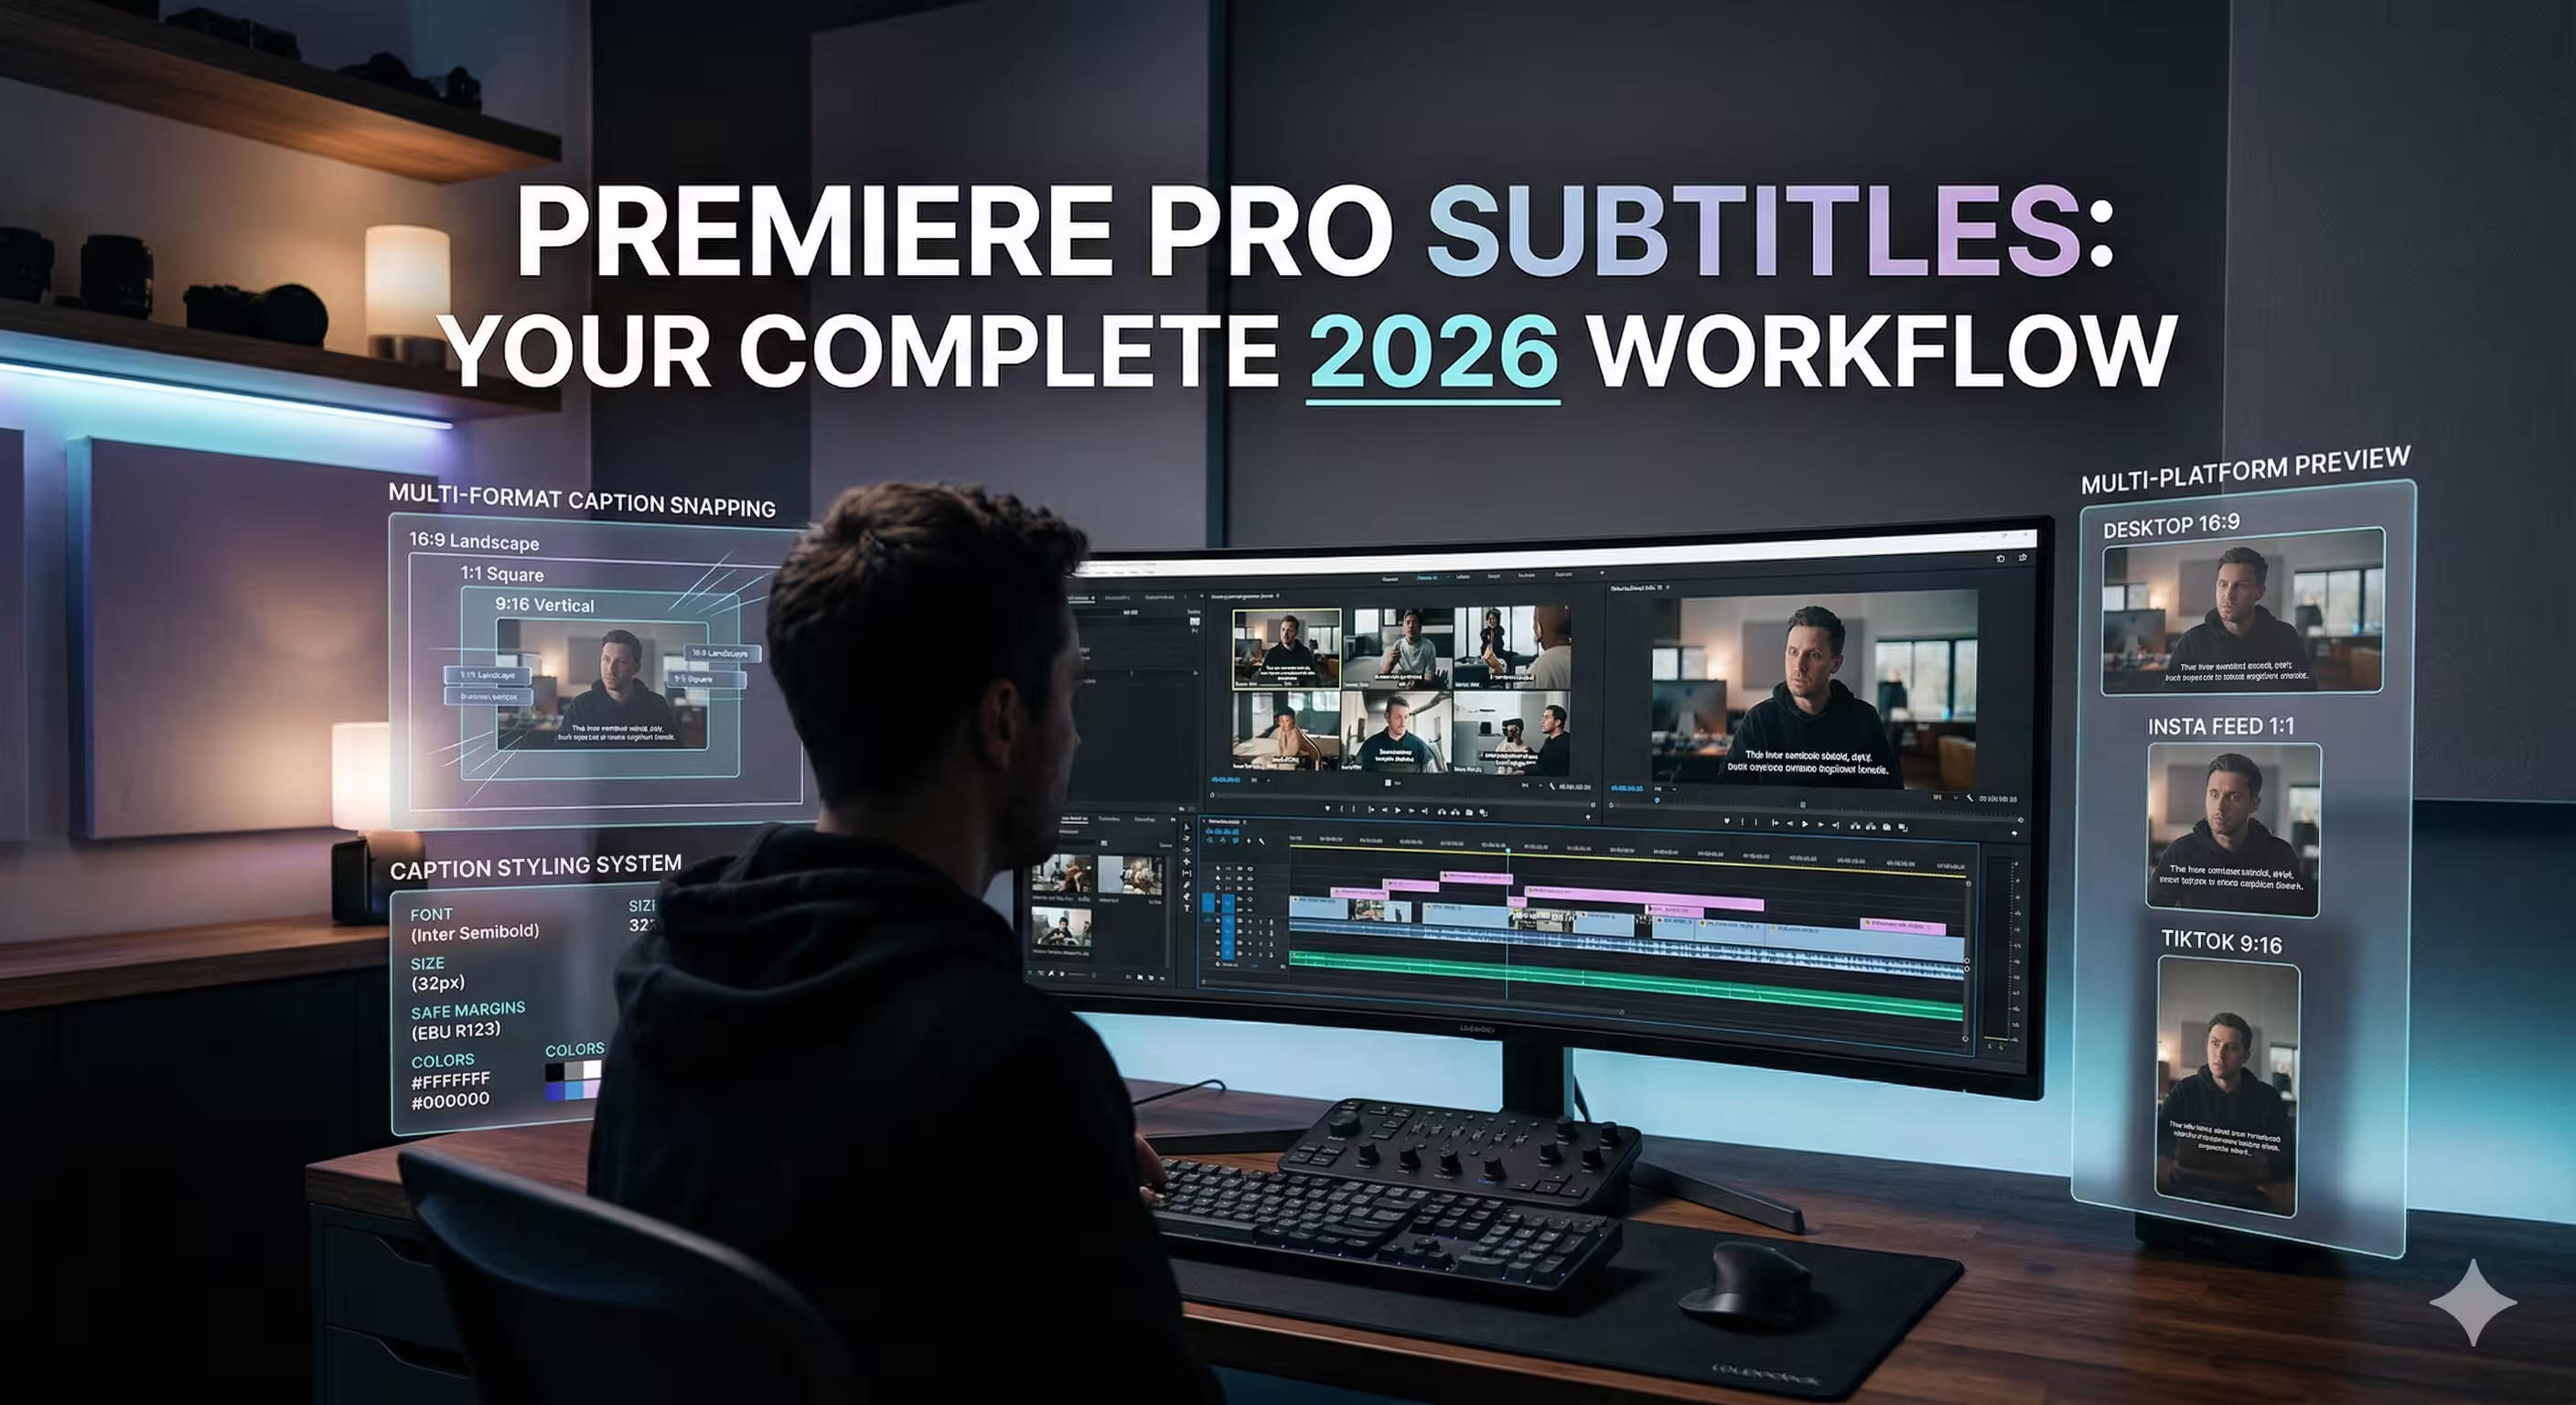
The Modern Premiere Pro Subtitle Workflow
The old workflow for premiere pro subtitles was fragmented. Editors either typed captions manually or exported the audio to an external service, waited for an SRT, brought it back in, and spent more time fixing it inside the timeline.
That changed when Adobe Premiere Pro introduced native automatic transcription in version 23.1, using Adobe Sensei AI to generate editable transcripts for entire timelines with a single click in the Text panel. The source material describing that release notes that it reduced manual captioning time from hours to minutes for many production teams in podcast and B2B workflows, as covered in this Adobe Premiere Pro transcription overview.
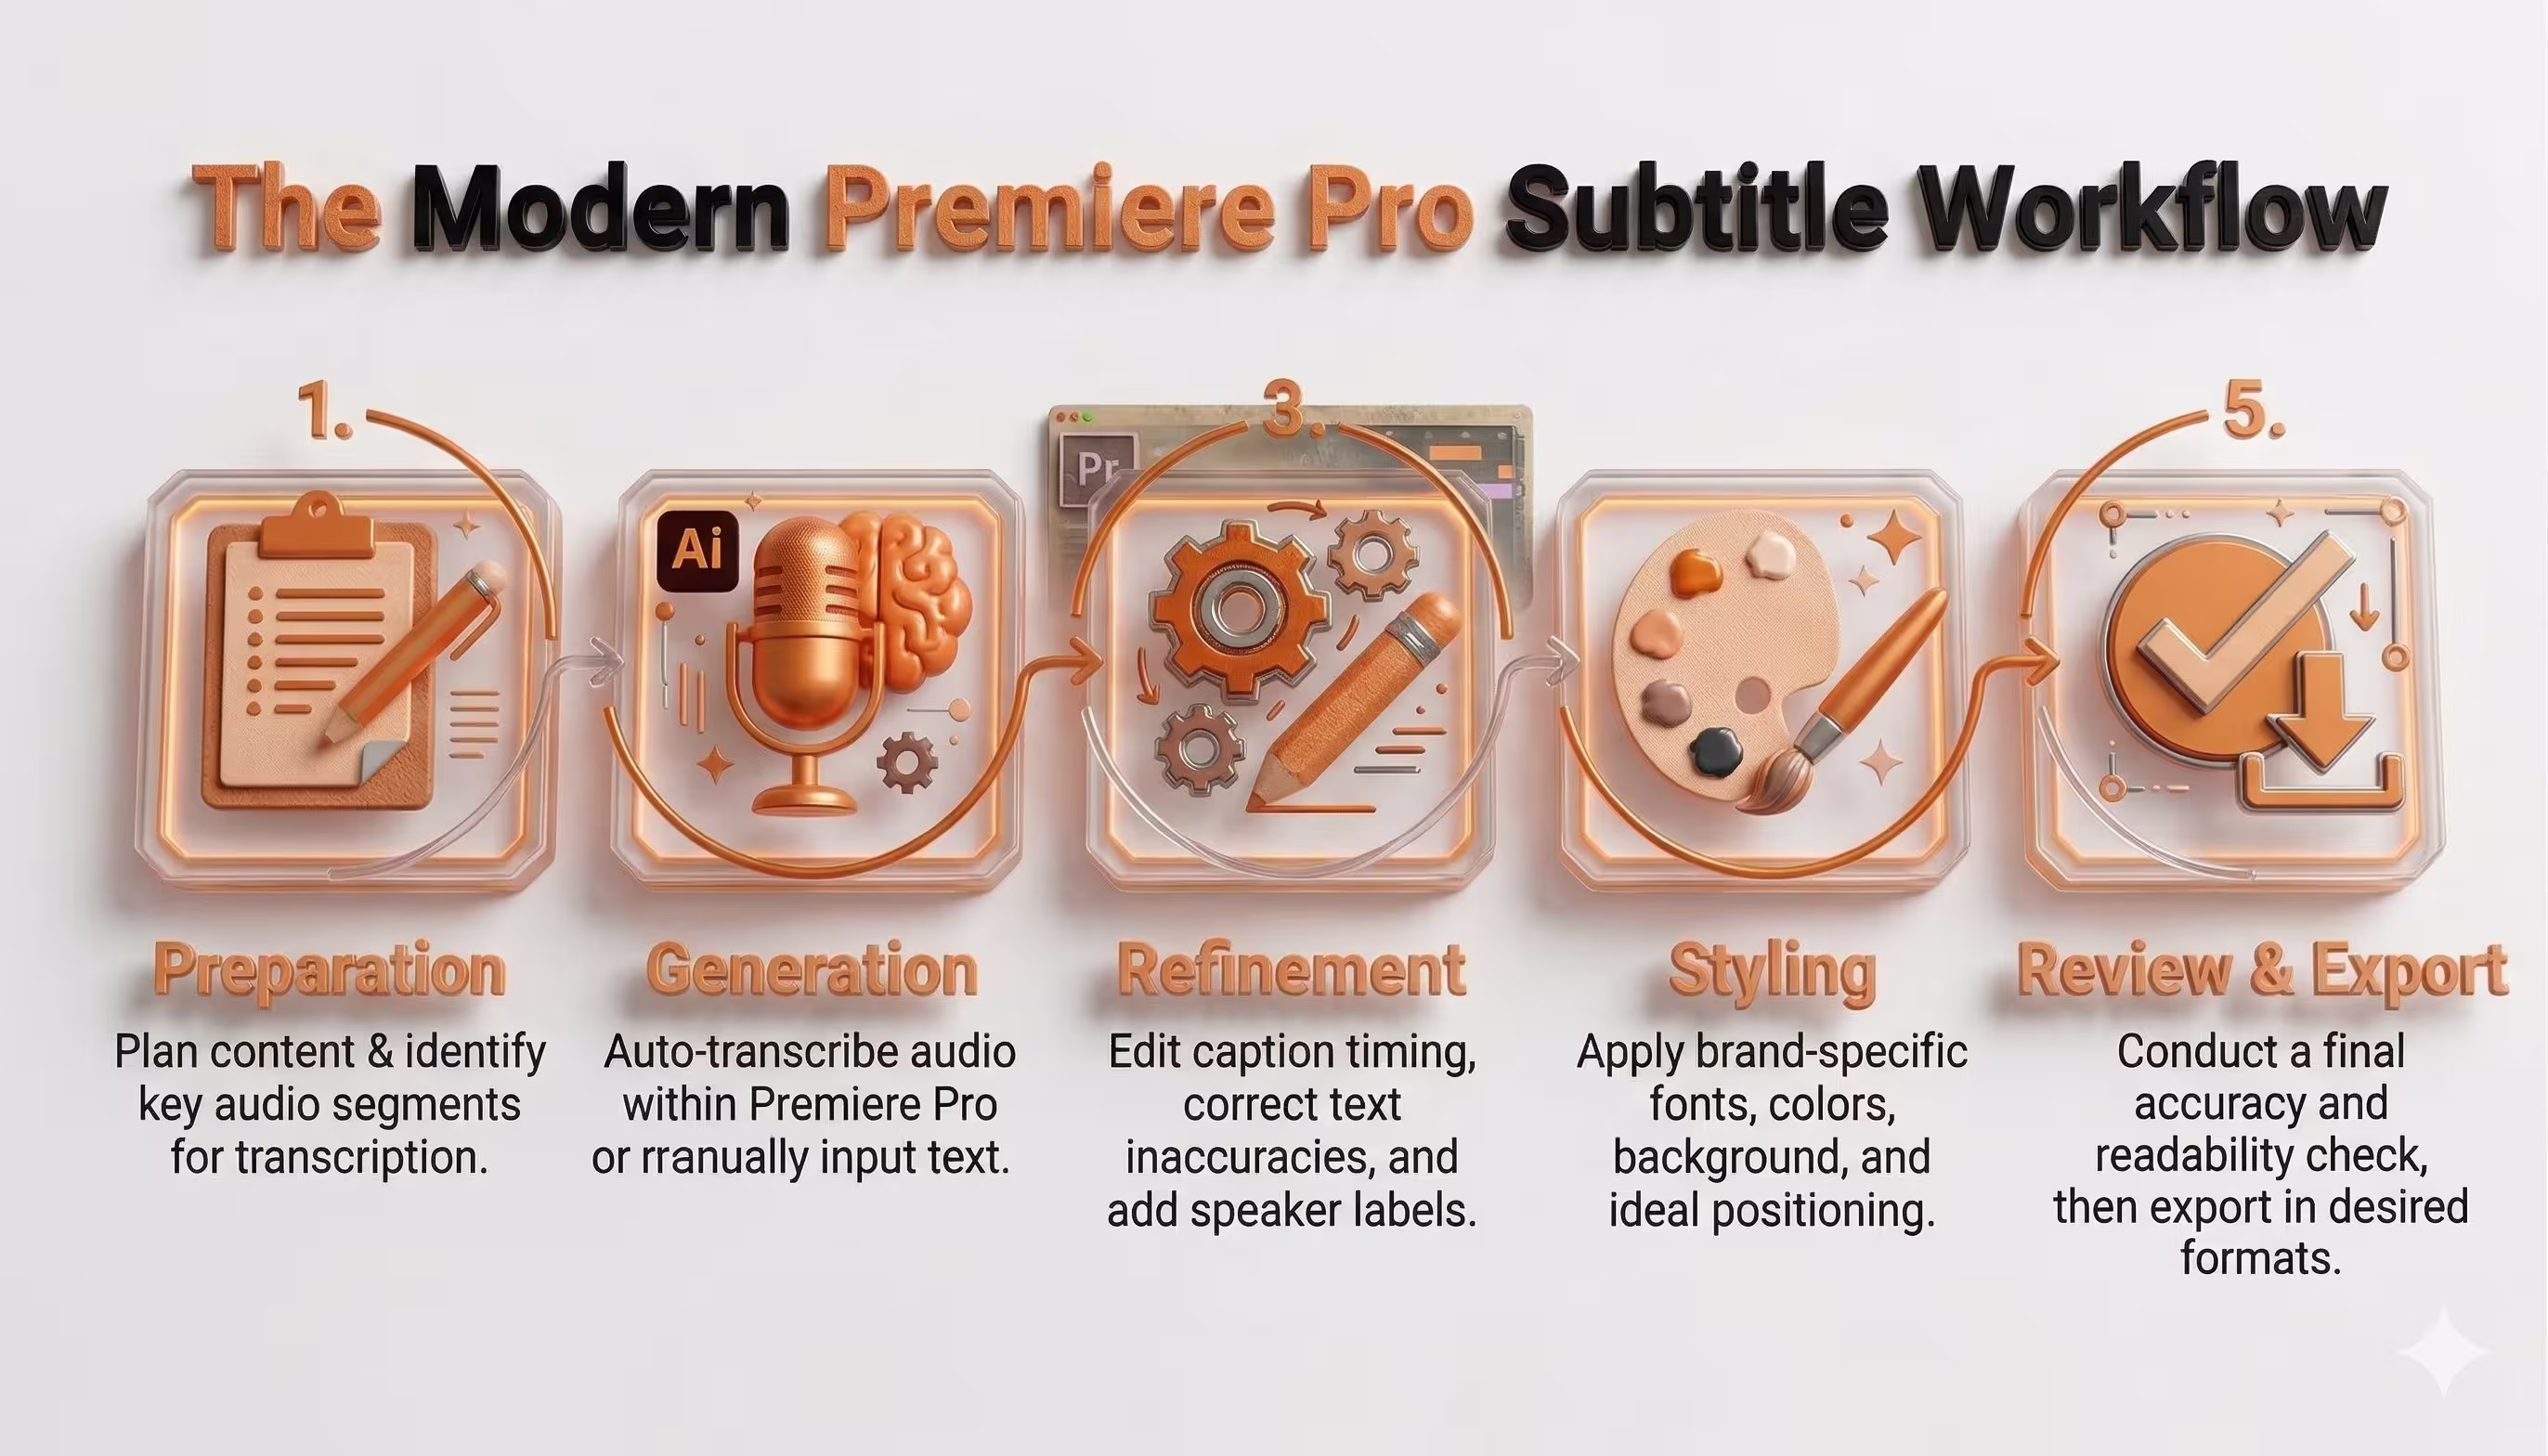
The workflow that holds up under deadline
The most reliable production model is simple:
- Prep the audio
- Transcribe the sequence
- Refine the text and timing
- Style for readability and brand consistency
- Export for the destination platform
This order matters. Editors get into trouble when they style too early, or export before checking readability on a phone-sized frame.
What changed inside Premiere
Premiere now handles subtitle work where editors already spend their time. That sounds obvious, but it changes how teams operate.
Instead of treating captions as a separate deliverable, you can now work on them as part of the sequence itself. The transcript is editable. The captions live on a track. The styling connects to the rest of the graphics workflow. That is the difference between “we can technically add captions” and “we have a repeatable captioning process.”
A practical version of the workflow looks like this:
- Start with audio cleanup: If the dialogue is muddy, the transcript will be worse.
- Transcribe from the sequence, not from memory: Let the system generate the base pass.
- Fix recurring language fast: Product names, guest names, and internal terminology should be corrected globally, not one caption at a time.
- Style late, but not last: Once the text is accurate, apply your caption design system.
- Export based on platform intent: Burned-in captions and sidecar captions serve different goals.
The Trade-off
Native transcription is fast. It is not final.
That is where inexperienced editors lose time. They assume auto-generated means publish-ready. It rarely does. What it gives you is a strong first draft directly in the NLE, which is exactly what a producer needs on a fast-moving content calendar.
Key takeaway: Premiere Pro is best used as a caption production environment, not just a caption generator.
That distinction matters. The teams that move fastest are not the ones who trust the first transcript blindly. They are the ones who use automation to eliminate the boring work, then spend their time on the fixes that affect watchability.
Generating and Refining Your Captions Step by Step
A clean subtitle workflow starts before you click Transcribe. If the sequence is disorganized, the transcript will inherit the mess.
For podcasts, interview shows, and executive roundtables, the best results come from treating captions as an editorial pass. Premiere can generate the first version quickly, but the producer still needs to shape it into something viewers can read comfortably.
Start with the sequence, not the captions panel
Open the final edited sequence first. Then check the audio.
If the timeline includes music, layered remote-call audio, or scratch tracks you no longer need, tidy that up before transcription. The speech engine performs better when the dialogue is the clearest thing in the mix.
The workflow guidance in this GoTranscript article on creating subtitles in Adobe Premiere Pro notes that Premiere’s built-in ASR reaches about 92% accuracy on clean audio, but accuracy drops when noise or accents complicate the signal. That is exactly what most podcasts deal with. In other words, clean audio saves editing time later.
Generate the transcript in the Text panel
With the sequence selected, open Window > Text. In the Text panel, choose the transcription option and set the correct language.
If your sequence contains multiple audio sources, be deliberate about what you feed into the transcript. For some episodes, transcribing the full mix is fine. For others, especially when music beds or extra sound elements sit under the dialogue, using the cleanest possible dialogue source gives you a better starting point.
Once transcription finishes, Premiere gives you an editable transcript tied to the sequence. That is the base material for your captions.
Turn transcript into captions
After the transcript is generated, convert it into captions inside Premiere. This creates a dedicated caption track on the timeline.
At this point, do not style anything yet. Read the captions as text first.
You are looking for four kinds of problems:
- Recognition errors: Names, acronyms, technical terms, and product language often come through wrong.
- Bad segmentation: Captions may break at awkward points in the sentence.
- Timing issues: Captions can appear slightly early, late, or hold too long.
- Punctuation gaps: Even when the words are mostly right, the readability may still be poor.
Fix the text in passes, not randomly
The fastest editors do not correct captions one box at a time from top to bottom. They work in passes.
First pass for recurring terminology
Podcast and B2B content often includes repeat language. Company names. Product names. Industry shorthand. Guest surnames.
Use search and replace where possible. If a guest’s last name is wrong once, it is probably wrong five times. Fixing that globally is faster than fixing it caption by caption.
This also applies to branded terminology. If your show discusses a product category repeatedly, teach your workflow to respect that vocabulary early in the pass.
Second pass for line breaks
Subtitle quality significantly improves here.
The same GoTranscript workflow notes that best practice is under 35 characters per line, with captions on screen for 1 to 7 seconds. Those are practical editing guardrails, not decoration. Long lines are harder to read. Fast flashes are stressful. Slow lingering captions feel out of sync.
Break captions by meaning, not by arbitrary character count alone.
Good break:
- “We changed the onboarding flow”
- “after the first customer interviews.”
Bad break:
- “We changed the onboarding”
- “flow after the first customer interviews.”
The first version matches the way people parse language. The second slows comprehension.
Producer tip: If a caption looks fine on a desktop monitor but feels dense, preview it smaller. Mobile framing exposes bad line breaks immediately.
Third pass for timing
Timing adjustments separate usable captions from professional ones.
Watch the speaker’s mouth, but also pay attention to thought rhythm. Captions should feel synchronized with meaning, not just with syllables. If a speaker lands a punchline, a key phrase, or a brand statement, let the caption support that beat.
A few practical timing habits help:
- Trim trailing silence: Captions should not hang after the speaker finishes unless the pause is meaningful.
- Avoid blink-speed flashes: If a short phrase appears too quickly, combine it with surrounding language if readability allows.
- Respect sentence flow: A caption should leave the screen at a natural transition point, not mid-thought.
Edit for spoken language, not written language

Subtitles are not transcripts in a strict legal sense for most marketing content. They are a viewing aid.
That means you can shape them for readability as long as meaning stays intact. Remove filler words when they distract. Add punctuation where it clarifies. Split run-on speech into cleaner units. Spoken language often needs light editorial shaping to become readable on screen.
This matters especially in podcasts, where guests think out loud. If you caption every “um,” restart, and false start, the screen becomes cluttered. If you over-clean, you risk changing the tone. The producer’s job is to strike the middle ground.
Handle music and multiple speakers carefully
Many podcast sequences include intro music, stingers, remote guest overlap, or panel-style interruptions. Auto-transcription can struggle here.
A few habits make these timelines easier:
- Mute what does not need to be transcribed: Temporary music can confuse speech recognition.
- Label speakers selectively: For panel discussions, speaker labels help. For one host and one guest in a standard frame, they are often unnecessary.
- Recheck interruptions manually: Crosstalk is one of the fastest ways to create unreadable captions.
If the episode includes speaker changes that matter to comprehension, prioritize clarity over speed. Viewers should not have to infer who said what when the conversation moves fast.
Build a review pass before sign-off
Never export straight after the edit pass. Run a review pass in playback.
Watch with sound on first. Then watch a few key sections with sound off. The sound-off test is the ultimate caption test. If the story still reads cleanly, the captions are doing their job.
Use this review checklist:
- Accuracy: Names, brands, and terminology are correct.
- Readability: No dense blocks or awkward breaks.
- Sync: Captions feel aligned with the speech.
- Coverage: No unexplained silent gaps where speech exists.
- Interference: Captions do not collide with lower thirds or graphics.
What works and what does not
What works is using Premiere’s auto-transcription as the starting point, then editing with a producer’s eye.
What does not work is trusting the first output because it looks mostly correct in the Text panel. “Mostly correct” is where review notes come from. It is also where brand credibility slips, especially when executive content contains names, titles, technical language, or regulated terminology.
A good subtitle workflow is fast because the system removes the heavy lifting. It is still human because viewers notice the details.
Designing Captions for Brand Impact and Readability
Captions are text, but they are also design. If they look detached from the rest of the video package, the audience notices.
A lot of premiere pro subtitles tutorials stop at “change the font and color.” That is not enough for a branded show. Caption styling should match the tone of the content, stay readable against unpredictable footage, and avoid fighting with lower thirds, logos, and product graphics.
Readability comes first
The first styling decision is not about taste. It is about whether the text is legible over motion, contrast changes, and small-screen viewing.
In Premiere, use the caption styling controls and related graphic tools to make careful decisions on:
- Font choice: Clean sans-serif fonts usually hold up best.
- Weight: A slightly heavier weight often survives compression better than a thin one.
- Background support: Subtle shadows, strokes, or background boxes can rescue readability over busy shots.
- Placement: Keep captions low enough to feel natural, but high enough to avoid interface overlays and platform UI.
The safest caption style is usually the one that feels invisible while still being unmistakably readable.
A useful visual walkthrough for styling lives in the video below.
Brand fit without overdesign
Captions should feel like part of the identity system, not a separate layer slapped on top at export.
That does not mean using every brand color. It means carrying over the brand’s visual logic. If your motion package is minimal and premium, the captions should not look loud and promotional. If the show is bold and social-first, captions can carry more visual personality.
Three styling decisions usually matter most:
- Type hierarchy: If the show uses a modern geometric font elsewhere, captions should not suddenly switch to something decorative.
- Color restraint: High contrast beats brand novelty. A branded accent can work in highlights, but body subtitle text needs clarity.
- Template consistency: Once you land on a style, save it and reuse it across the series.
Key takeaway: The best caption style often feels boring in the settings panel and excellent in playback.
Watch for collisions with other graphics
Many branded videos break down at this point.
Captions may be technically well designed, but still fail because they sit on top of lower thirds, guest names, product demos, or on-screen charts. For podcasts, this is common when the bottom third of the frame already carries branding elements.
A simple producer habit fixes most of this. Review at least one representative section of the edit where all your common on-screen elements appear together:
- Lower third plus captions
- B-roll plus captions
- Screen share plus captions
- Vertical crop plus captions
If the style works only on the hero interview frame, it is not production-ready.
Save approved styles as presets so every episode starts from the same visual baseline. That is how subtitle work stays efficient across a recurring series.
Exporting Subtitles for YouTube LinkedIn and More
Export is where strategy matters. The wrong subtitle format can create unnecessary work downstream, even if the captions themselves are excellent.
Teams often choose between two approaches:
- Burned-in captions, where the text is baked into the video file
- Sidecar subtitles, usually as an SRT, delivered alongside the video
Neither is universally better. The right choice depends on how the platform handles text, how much control you need after publish, and whether the same master asset will be reused elsewhere.
Burned-in versus sidecar
Burned-in captions are the safe option when you need total visual control. What you see in Premiere is what the audience gets.
That works well for social clips, executive promos, paid placements, and any asset where typography is part of the brand design. Burned-in captions also remove uncertainty when a platform handles sidecar files inconsistently.
Sidecar files are more flexible. They are useful when the platform supports native subtitle upload and when you may need to revise text after export without re-rendering the entire video. They also help when one video needs multiple language versions.
Subtitle export settings by platform
How to choose under deadline
If you need one rule for production teams, use this:
- Choose burned-in when visual consistency matters most.
- Choose sidecar when flexibility and platform-native subtitle control matter most.
For repurposing workflows, this matters even more. A long-form episode may deserve a clean master plus sidecar captions, while the cutdowns extracted from that same episode should often ship with baked captions. That split saves time later when one conversation becomes many assets. If your team is building that kind of system, this guide to content repurposing services reflects the broader operational challenge well.
Common export mistakes
A few export mistakes show up repeatedly:
- Using one subtitle style for every platform: A style that works in 16:9 may fail in vertical.
- Not checking safe areas: Platform UI can cover text near the bottom edge.
- Delivering only burned-in files: This limits flexibility if a text correction appears later.
- Delivering only SRT files: This can create design inconsistency on channels where native styling is weak.
Producer tip: For flagship episodes, keep both. A clean master, a burned-in master, and an SRT create far fewer headaches than trying to reverse-engineer deliverables later.
A strong export workflow does not ask “What file can Premiere make?” It asks “How will this video be published, clipped, revised, and reused?”
Advanced Producer Workflows and Time-Saving Tips
High-volume captioning gets difficult when the content itself gets difficult. Single-speaker edits are easy. Multi-cam interviews, bilingual content, overlapping speech, and global distribution are where the workflow either scales or breaks.
Managing multi-speaker podcast edits
Panel conversations and fast-paced interviews create subtitle clutter quickly. Two people interrupting each other may be natural to watch, but painful to caption.
The solution is rarely “caption everything exactly as spoken.” Better choices include:
- Prioritize the dominant speaker when overlap is minor
- Use speaker labels selectively when clarity depends on identity
- Break long exchange sequences into tighter readable units
- Check subtitle placement against multi-cam reframes so text does not drift into lower thirds or cropped areas
In practical terms, subtitles should help the viewer track the conversation, not reproduce every collision in real time.
Build translation into the workflow early
Multi-language delivery is where many teams lose control. They finish the English episode, export quickly, then realize they need translated subtitles after the fact.
The verified source material notes that multi-language subtitle workflows are still poorly covered, even though demand is rising. It also states that recent Premiere Pro updates introduced AI translation features, while user queries on forums have spiked 40% over the last year regarding non-English SRT imports without desynchronization in this Adobe community-linked discussion reference.
That aligns with what producers encounter. Translation is not just a text problem. It is a timing problem.
Practical rules for multilingual versions
If you know a project may ship in more than one language, set it up that way from the start.
- Lock the picture first: Caption sync gets messy if editorial changes continue after translation begins.
- Keep a clean source transcript: This makes handoff and revision easier.
- Test imported subtitle files before final export: A technically valid SRT can still feel wrong in the timeline.
- Review line length again after translation: Text expansion changes readability fast.
For global-facing teams, translated subtitles should be treated as a versioned deliverable, not a last-minute add-on. If the content is central to thought leadership or launch communications, it often makes sense to bring in extra editorial support rather than assuming one-click translation will hold up on its own. Teams trying to standardize this at scale often benefit from a broader professional video editing service approach, where the subtitle workflow is part of post-production planning rather than an isolated task.
Key takeaway: Subtitle automation scales best when the editorial system around it is stable.
Common Premiere Pro Subtitle Problems and Fixes
Most caption tutorials cover generation. Fewer deal with the moments when premiere pro subtitles look wrong, export badly, or refuse to behave under deadline.
The most frustrating issues are usually not dramatic. They are the small quality problems that create review rounds.
Blurry or jagged caption text
One of the most common complaints is poor text quality on export. The verified source material notes that poor text quality and hard edges in captions are a frequent and underserved complaint, and that many producers end up using legacy Essential Graphics-style workarounds for sharper results, as discussed in this video addressing Premiere subtitle text quality issues.
If your captions look soft or harsh at the edges:
- Compare native captions against Essential Graphics text on a short export test
- Check the final delivery resolution and scaling before assuming the style is the problem
- Review on the target platform, not only inside Premiere
- Use the sharper workflow for the final deliverable, even if it is less elegant operationally
If crisp text matters more than editable caption convenience, a graphics-based workaround may be the better choice.
Captions drift out of sync
This usually happens after editorial changes, especially if text files were imported before the sequence was locked.
Fixes that work:
- Recheck the sequence version before import
- Avoid late timing changes after caption approval
- Spot-check the start, middle, and end of the timeline instead of only the opening minute
If the offset grows over time rather than staying consistent, the problem is usually structural, not just a simple shift.
Imported subtitles break formatting
Imported SRT files often come in with acceptable text but disappointing layout. That is normal.
Treat imported subtitles as content, not finished design. The text may survive the trip. The styling usually needs rebuilding inside the project you are delivering.
Special characters or foreign language issues
This still catches teams on multilingual projects. If characters display incorrectly, the issue may be with file encoding or the import path rather than the words themselves.
The practical move is to test a short sample first. If one language import behaves strangely, do not wait until final export to troubleshoot it.
A caption workflow should reduce revisions, not create them. The fastest teams are the ones that know when to trust the built-in tools and when to use a workaround without fighting the software.
If your team wants polished subtitles without adding another fragile step to post-production, micDrop helps brands, executives, and podcast teams handle the full workflow from recording through editing, captioning, repurposing, and platform delivery. That means fewer manual fixes, cleaner branded outputs, and subtitle systems that hold up across YouTube, LinkedIn, Spotify, TikTok, and beyond.


