Launch Your Show: How to Start a Video Podcast

Thinking about launching a video podcast? It’s a completely different game than audio-only. You have to think strategically about visuals right from the start.
The whole process boils down to a few key areas: nailing your show's concept, getting the right remote recording setup, creating a pro-level post-production workflow, and then pushing your content out on video-first platforms like YouTube and TikTok.
Why Video Podcasting Is No Longer Optional
In 2026, the conversation isn't if you should add video to your podcast. It's how you're going to do it well.
Gone are the days when video was just a nice-to-have. To succeed today, you need a video-first mindset. Visual storytelling has to be baked into your content strategy from day one, mainly because audience habits have changed for good. YouTube is now a beast for podcast discovery.
The Undeniable Dominance of Video
The numbers don't lie. Launching a video podcast in 2026 means you're stepping into a market where YouTube alone pulls in over 1 billion monthly podcast viewers. That’s massive.
Video is now the main driver for podcast discovery. In fact, roughly 53% of U.S. listeners prefer to watch their podcasts on YouTube, making it the top platform on the planet for podcast consumption (Source: Statista, 2023). With an estimated 4.58 million podcasts out there, a killer visual strategy is your only way to cut through the noise and grab new listeners.
This means you can't just hit 'record' and hope for the best. It takes an end-to-end production approach to deliver that polished, TV-quality feel that audiences now expect.
Actionable Insight: Your audience doesn't just listen anymore—they watch. A visually engaging show isn't a luxury; it's a non-negotiable for growth and building authority. Start by storyboarding your first three episodes with visual elements in mind, like on-screen graphics or physical props.
What a Video-First Approach Involves
Thinking "video-first" is a mindset shift. You're planning your content with the camera in mind from the get-go, creating a show that's as good to watch as it is to listen to. The strategy is fundamentally different, something we break down in our guide on podcasts vs. YouTube.
A modern, video-centric workflow looks like this:
- Guided Remote Recording: Making sure you and your guests look and sound fantastic, even if you’re miles apart.
- Dynamic Multi-Cam Editing: Cutting between camera angles to keep the energy up and give your show a professional broadcast feel.
- Professional Finishing: This is the polish—color grading, sound design, and slick, branded motion graphics that scream credibility.
- Multi-Platform Optimization: Slicing up your main episode into bite-sized clips designed specifically for TikTok, LinkedIn, and Instagram to cast a wider net.
When you adopt this approach, you stop just recording a chat. You start producing a powerful media asset that builds real connections and elevates your entire brand.
Building Your Strategic Foundation Before You Record
Let's be blunt: a fancy camera and an expensive mic mean nothing if you don't have a strategy. Too many creators jump straight into recording, burn out, and wonder why nobody’s watching.
The difference between a show that builds a loyal audience and one that fizzles out is the groundwork you do before hitting record. This is where you lay the foundation for everything that follows.
Nail Down Your Core Identity
It all starts with a simple, critical question: who, specifically, are you talking to? "Business professionals" isn't an audience; it's a demographic. You need to get granular.
Are you making this show for early-stage SaaS founders trying to bootstrap their first $1M? Or is it for B2B marketers at enterprise companies who need to understand the impact of AI? The more specific your audience, the more your content will resonate. Every topic, every guest, and every question should be filtered through this lens.
With your audience locked in, you can choose a format that actually works for your brand and your goals. Don’t just pick what’s popular; pick what makes sense for you.
Actionable Insight: A common mistake is forcing a format that doesn't fit. An interview show seems like the default, but if you're a brilliant solo presenter with a strong point of view, forcing a Q&A can water down your unique edge. Before committing, record one pilot episode in two different formats (e.g., one solo, one interview) to see which feels more natural and powerful.
If you’re a founder looking to establish thought leadership, a solo show sharing your hard-won insights could be a powerful move. If your goal is to build your network, an interview format is your best bet for connecting with industry leaders.
Once you have your audience and format, you can define your Unique Value Proposition (UVP). This is your promise to the viewer—the clear, compelling reason they should watch your show instead of the millions of others. It’s what you stand for.
Choosing Your Video Podcast Format
Your show's format is a major strategic decision that will shape your entire production workflow. From scripting and guest booking to the complexity of your edit, the format dictates the level of effort required.
We've laid out a few of the most popular formats below to help you see how they stack up.
Choosing Your Video Podcast Format
Ultimately, the best format is the one you can commit to and execute consistently.
Whether you're a solo founder using a podcast to build authority or a B2B brand aiming for lead generation, this strategic foundation is the blueprint for a show that not only launches but thrives. By defining your audience, format, and UVP first, you set yourself up for long-term success.
Assembling Your Pro-Level Remote Studio
With your strategy locked in, it's time to build your recording space. In video podcasting, production quality isn't just a nice-to-have; it's a baseline expectation. Your audience expects a certain level of polish, and a crisp, professional show is the fastest way to build credibility and keep them watching.
The great news? You don't need a Hollywood budget to look and sound incredible. You can put together a professional-grade remote setup with accessible gear, whether you're just starting out or ready to level up your existing kit.
Essential Gear for Every Budget
Your gear choices directly shape your final product. It’s not about buying the most expensive equipment, but investing smartly where it counts most: audio, video, and lighting.
Here’s a breakdown of gear options, from a solid starter kit to a full-blown professional setup:
- Good (Starter Kit): This is the perfect entry point. A high-quality 1080p or 4K webcam (like a Logitech Brio), a great USB microphone (like a Blue Yeti or Rode NT-USB+), and a simple ring light will instantly put you miles ahead of a standard laptop camera and mic. It's affordable, effective, and easy to use.
- Better (Intermediate Setup): Ready for a serious upgrade? Swap the webcam for a DSLR or mirrorless camera connected via a capture card. This is how you get that beautiful, blurred background (bokeh) and far superior image control. Pair it with an XLR microphone (like the legendary Shure SM7B or Rode Procaster) running through an audio interface for that rich, broadcast-quality sound.
- Best (Advanced Studio): For the ultimate professional look, you'll want a high-end mirrorless or cinema camera with premium lenses. Instead of a single light, use a three-point lighting setup (key, fill, and back lights) to create depth and sculpt your shot. Your audio gets a boost with a top-tier XLR mic and a dedicated mixer like the Rodecaster Pro II for maximum control.
Actionable Insight: A common mistake is obsessing over video quality first. The truth is, audiences will forgive a slightly soft image, but they won't tolerate bad audio. Prioritize a clean, crisp microphone setup from day one—it’s the most important investment you’ll make. Test your audio by recording in your chosen space and listening back with headphones to identify echo or background noise before you record a full episode.
Mastering the Remote Recording Workflow
Once your gear is in place, you need a process for recording, especially when guests are involved. The real challenge is making a conversation happening in two different places feel like it's taking place in the same room.
This is where a lot of new podcasters get tripped up. To get that dynamic, multi-camera look, you need separate, high-quality audio and video tracks from both you and your guest. Platforms like micDrop solve this with guided recording sessions, ensuring you get isolated tracks that can be seamlessly cut together in post-production for a true broadcast feel.
With the global podcast audience expected to grow to over 619 million by the end of 2026 (Source: eMarketer, 2023), a professional multi-camera look is no longer a luxury. It’s what you need to compete, especially since a third of listeners discover podcasts on YouTube.
Staging Your Scene and Guiding Your Guests
Your recording environment is just as important as your camera. You don't need a custom-built set, just a clean, appealing, and distraction-free backdrop. Think of it as set design—a simple bookshelf, a piece of art, or a clean wall with some soft lighting can work wonders.
For a deep dive into creating the perfect space, check out our complete guide on how to set up a podcast studio.
Don't forget your internet. A stable, hard-wired ethernet connection is always the right call. It prevents the dropouts and pixelation that can ruin an otherwise great take. Finally, set your guests up for success by sending them a simple one-sheet with a few key tips:
- Find the Light: Have them face a window for soft, natural light.
- Find a Quiet Space: Ask them to close doors and windows to kill background noise.
- Frame the Shot: Guide them to position their camera at eye level for a more direct and engaging connection with the audience.
Mastering Your Pre-Production and Recording Workflow
A polished recording doesn't just happen when you hit "record." It's born from thoughtful pre-production. This is where you build the foundation for a tight, engaging conversation that actually holds a viewer's attention—a make-or-break metric on platforms like YouTube.
Think like a director prepping for a shoot. You wouldn't just show up, turn on the cameras, and hope for the best. You need a plan. A simple bulleted outline is your roadmap, giving your conversation a skeleton with key talking points, transitions, and must-have soundbites.
This outline keeps you on track, prevents rambling, and ensures you deliver on the promise you made to your audience.
Architecting a Compelling Episode Structure
Before you can guide a great conversation, you have to know where it's going. A clear structure is the secret sauce to an episode that feels professional and flows naturally.
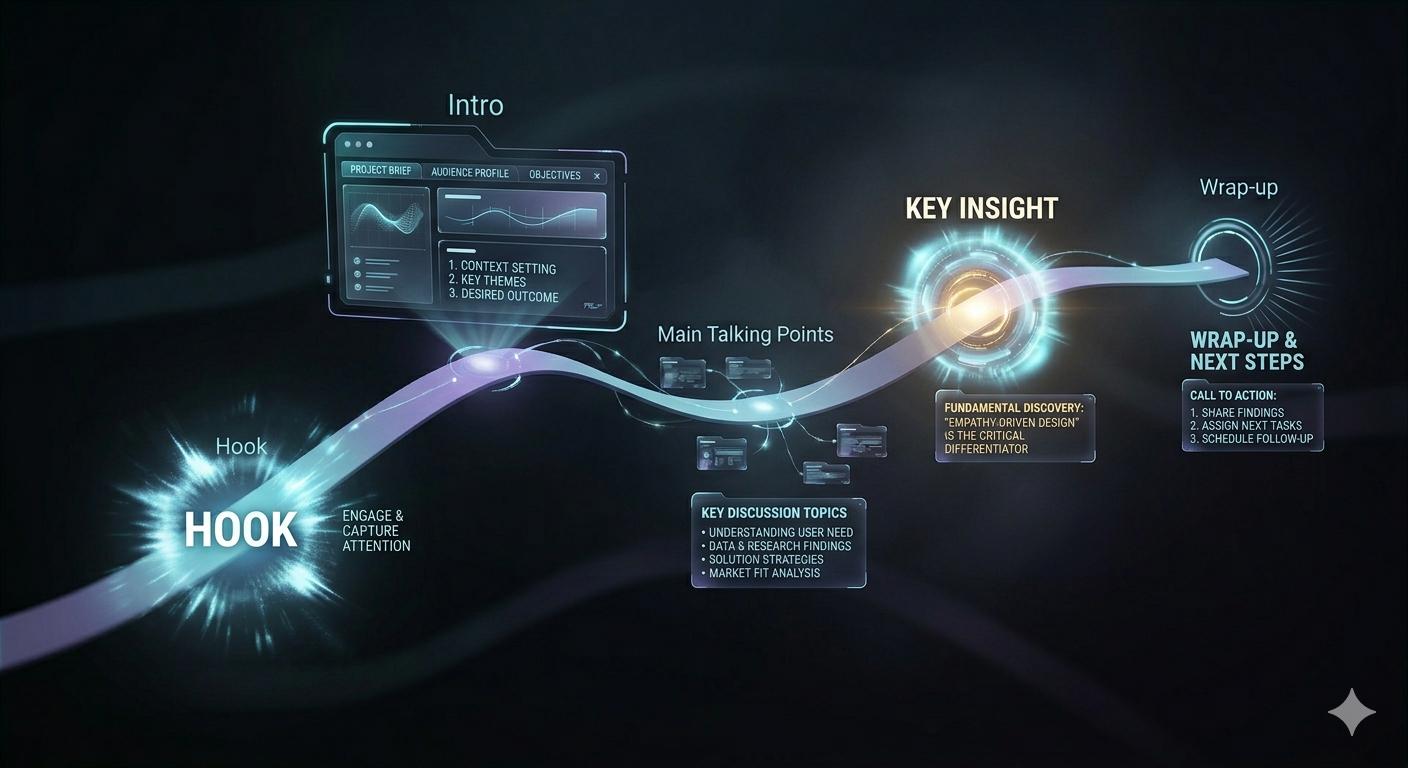
Here are the core beats your episode outline should hit:
- The Hook: Grab your viewer in the first 15-30 seconds. Start with a bold statement, a surprising statistic, or a question they need an answer to.
- The Intro: Quickly introduce the topic and your guest. More importantly, tell your audience why this conversation matters to them right now.
- Main Talking Points: Break down your topic into 3-5 core segments. Think of these as chapters in your story, each with its own set of questions.
- The Key Insight: Build the conversation toward one powerful, central takeaway. This is the "aha" moment you want people to remember and share.
- The Wrap-Up: Briefly summarize the key lessons and close with a clear call-to-action (like "subscribe" or "connect with our guest").
This isn't about a word-for-word script. Over-scripting sounds robotic and kills authenticity. The goal is a solid framework that allows for spontaneous, real discussion while keeping the episode focused and on time.
A Director's Guide to Guest Management
When you bring a guest on your show, you're not just a host. You're their director, producer, and tech support, all rolled into one. A smooth guest experience almost always translates to a better on-camera performance.
Your guest management should be a well-oiled machine. A simple checklist ensures you cover all the bases so your guest feels confident, prepared, and ready to shine.
Actionable Insight: A guest who feels prepared and comfortable will give you a much better interview. Your pre-production work is just as much about managing their experience as it is about planning your content. Create a "Guest Welcome Packet" (a one-page PDF) that includes the recording link, tech tips, a brief show overview, and the main topics you plan to discuss.
This simple diagram shows the critical remote studio setup you should be sharing with every guest.
It breaks down the three pillars of a quality remote setup—camera, microphone, and lighting. Getting these right is essential for capturing high-quality footage that you can actually use.
The Art of the Remote Recording Session
During the recording itself, your role shifts from planner to conductor. Your job is to guide the conversation, keep the energy high, and make sure you capture clean, separate audio and video tracks for each person.
Platforms like micDrop excel here by providing guided remote recording that handles all the technical heavy lifting, letting you focus completely on the conversation. But even if you're running the show yourself, a few directorial tips go a long way.
Pro-Tips for Directing a Remote Session:
- Run a Tech Check: Always start with a 5-10 minute tech check. Confirm their audio is clear, their video is framed well, and their internet is stable. Don't skip this.
- Set the Energy: Your enthusiasm is contagious. Be the engaged, energetic host you want your guest to mirror. It sets the tone for the entire recording.
- Use Your Outline Flexibly: The outline is a guide, not a cage. If the conversation takes an interesting and valuable detour, follow it.
- Capture Separate Tracks: This is non-negotiable for a professional video podcast. Recording separate audio and video files for each person (multi-track recording) gives your editor the power to cut between angles, fix audio issues, and create a far more dynamic final product.
By mastering this workflow, you stop just "recording a call" and start producing a compelling piece of content—one that looks and sounds professional, respects your guest's time, and captivates your audience.
Step 5: Transforming Raw Footage Into a Polished Episode
You've hit "stop record." The raw files are saved. Now the real work begins. This is post-production, where you take a simple conversation and sculpt it into a professional, engaging show that your audience can't turn off.
This is where the magic happens.
Think of your raw footage as a block of marble. Post-production is the chisel. It’s not just about snipping out the "ums" and "ahs." It’s about shaping the narrative, controlling the pace, and adding a layer of polish that builds instant credibility.
Mastering the Multi-Camera Edit
Ever watch a network interview and notice how the camera angles switch? That's not just for show. It's a technique called multi-camera editing, and it's your secret weapon for creating a dynamic rhythm.
By cutting between different shots—a wide view of everyone, then close-ups on the speaker or the listener—you keep the viewer locked in. It turns a static video call into a broadcast-quality experience.
When your guest makes a powerful point, cut to their close-up to amplify the impact. When you ask a question, switch to a wide shot to reset the scene. It’s a visual dance that directs your audience's attention exactly where you want it.
Polishing Visuals with Color Grading
Once your edit is locked, it's time for color grading. This is how you adjust the color and tone to create a consistent, professional look that separates amateur footage from a polished show.

Let's face it: you and your guest were recorded in different rooms with different lighting. Color grading makes it feel like you’re in the same world.
- Color Correction: This is the technical first step. You'll adjust exposure, white balance, and contrast to make everything look clean and natural.
- Color Grading: Now for the creative part. You can apply a specific "look"—maybe warm and inviting, or cool and corporate—that matches your brand and sets the mood.
A consistent color palette makes your show instantly recognizable.
Actionable Insight: A well-graded video looks intentional. It tells your audience you sweat the details, which builds authority before a single word is spoken. Create a color preset (a LUT) based on your brand colors and apply it to every episode for a consistent, professional look.
Achieving Crystal-Clear Audio
Great audio is non-negotiable. Viewers will tolerate grainy video, but they will bounce the second your audio is muffled, noisy, or hard to follow.
Your goal is to sound like you recorded in a pro studio, even if you didn't. For those looking to dive deep, learning to edit with powerful software like Reaper is a game-changer. The process involves a few key steps:
- Noise Reduction: Kill the background hum from an AC unit or computer fan.
- Equalization (EQ): Tweak the frequencies in your voice to make it sound full and clear.
- Compression: Smooth out the volume so there are no jarringly loud moments or quiet whispers.
- Music & SFX: Mix in your intro/outro music and any other sound elements.
Adding Branded Graphics and Thumbnails
The final layer is adding the branded elements that make the show yours. These graphics give your podcast a cohesive, polished look and reinforce your brand identity.
Key assets include:
- Motion Graphics: Animated intros, outros, and transitions that give your show a broadcast-quality feel.
- Lower Thirds: Simple on-screen graphics identifying the host and guests.
- Thumbnails: This is arguably the most important graphic you'll create. A great thumbnail on YouTube uses compelling imagery and bold text to earn the click.
Your thumbnail and title are your episode's first impression. Spend time creating a design that stops the scroll and clearly communicates the episode's value.
Distributing Your Podcast and Measuring What Matters
You’ve done the hard work—your episode is edited, polished, and ready to go. But what's the point of a killer video podcast if no one ever sees it? Getting your show out there isn't just a final step; it's where the real work begins.
This is the pivot from creator to marketer. It's time to get your content in front of the right eyeballs, figure out what's resonating, and use that insight to make your next episode even stronger.
Optimize for Your Key Channels
Throwing the same video file everywhere and hoping for the best is a surefire way to get ignored. Every platform has its own rhythm, its own audience, and its own algorithm. If you want to cut through the noise in 2026, you have to play by their rules.
Think about it: people on YouTube consume content differently than they do on LinkedIn or TikTok. Your job is to meet them where they are with content that feels like it belongs there.
- YouTube: This is your home base and your main stage. Treat every upload like an SEO goldmine. That means a keyword-rich title, a detailed description packed with relevant terms and timestamps, and a custom thumbnail that screams "click me." YouTube is a search engine, and it rewards content that keeps people on the platform.
- Spotify & Apple Podcasts: Video may be the star, but the audio-only experience is far from dead. A huge chunk of your audience still listens on the go. Make sure your RSS feed is properly set up to deliver both audio and video versions to major podcast players like Spotify and Apple Podcasts. Their search is getting smarter, too, often indexing your transcripts so your spoken words become searchable.
- Short-Form Video (TikTok, Reels, Shorts): This is your discovery engine. Pull the best 60-second moments, add captions, and format them for vertical viewing. These clips are your trailers, designed to hook new viewers and pull them back to the full episode on YouTube.
Move Beyond Vanity Metrics
Sure, big download and view counts feel great, but they don't pay the bills or prove your show has an actual impact. To understand your podcast's true performance, you need to dig deeper into the metrics that measure real human engagement.
These are the numbers that tell you if people are actually connecting with what you’re making.
Actionable Insight: Don't get lost in a sea of data. High view counts are meaningless if everyone bails after the first 30 seconds. Focus on the numbers that give you clear, actionable feedback on what your audience loves—and what they don't. Each month, pick one metric to improve (e.g., audience retention) and test one new strategy to influence it.
Keep your eyes on these key performance indicators (KPIs) to get a real pulse on your show's health:
- Audience Retention: This is your most important metric, period. The retention graph in YouTube Studio is a roadmap of your audience's attention. See a huge drop-off in the intro? It’s too long or boring. Notice a spike in the middle of a segment? That's a topic your audience craves. Make more content like that.
- Average Watch Time: This tells you exactly how long people are sticking around. A high average watch time is a powerful signal to platforms like YouTube that your content is valuable, which helps it get pushed in search results and recommendations.
- Click-Through Rate (CTR): Your CTR shows how many people who see your thumbnail and title actually click to watch. If it's low, it's a sign that your packaging—your title and thumbnail—isn't compelling enough to earn the click.
- Audience Demographics: Who's watching? Knowing their age, gender, and location confirms whether you're hitting your target audience. If there's a mismatch, it’s time to rethink your content or your promotion strategy.
This data-driven feedback loop is your secret weapon. When you stop guessing and start listening to the numbers, you can build a show that doesn't just launch, but grows consistently over time.
Common Questions About Starting a Video Podcast
Thinking about launching a video podcast? Good. You're already ahead of the curve. But if you're like most creators we talk to, a few big questions are probably holding you back.
Let's cut through the noise and get you the straight answers on cost, competition, and what it really takes to get on camera.
Is It Too Expensive to Start?
Absolutely not. While you could drop thousands on a high-end studio setup, you can get a professional-sounding show off the ground for less than $200.
Focus your budget on a quality USB microphone, a solid 1080p webcam, and a basic ring light. That's it. Prioritize clean audio above all else—your audience will forgive grainy video long before they tolerate bad sound.
Is the Market Too Saturated?
It's a common fear, but the data tells a different story. Yes, there are over 37 million YouTube channels (Source: DemandSage, 2024), but the number of active podcasts is closer to 2 million. The video podcasting space is far less crowded than you think.
The opportunity to carve out a niche with consistent, high-quality video is massive.
Actionable Insight: The secret isn't to be the only voice, but to be a distinct voice. A unique perspective combined with professional production will always find an audience. Before launching, identify 3-5 other shows in your niche and write down one thing your show will do differently or better.
Do I Have to Be on Camera?
While a face-to-camera show is the classic format, it’s not your only play. If you're not ready for your close-up, you can still create a killer video podcast.
Consider these powerful alternatives:
- Audiograms: A static, branded image with your audio layered on top. Simple, effective, and great for sharing clips.
- Animated Visuals: Use simple animations or motion graphics that complement your topic.
- Screen Recordings: A must for any tutorial, presentation, or product-demo-style content.
The right format is the one that best serves your content and feels authentic to you. The goal is to deliver value, not just a face on screen.
Ready to launch a polished, professional video podcast without the production headaches? micDrop offers an end-to-end service, from guided remote recording to multi-platform publishing, so you can focus on creating great content. Learn more about how we can help.


