The Ultimate Frequency EQ Chart for Perfect Audio
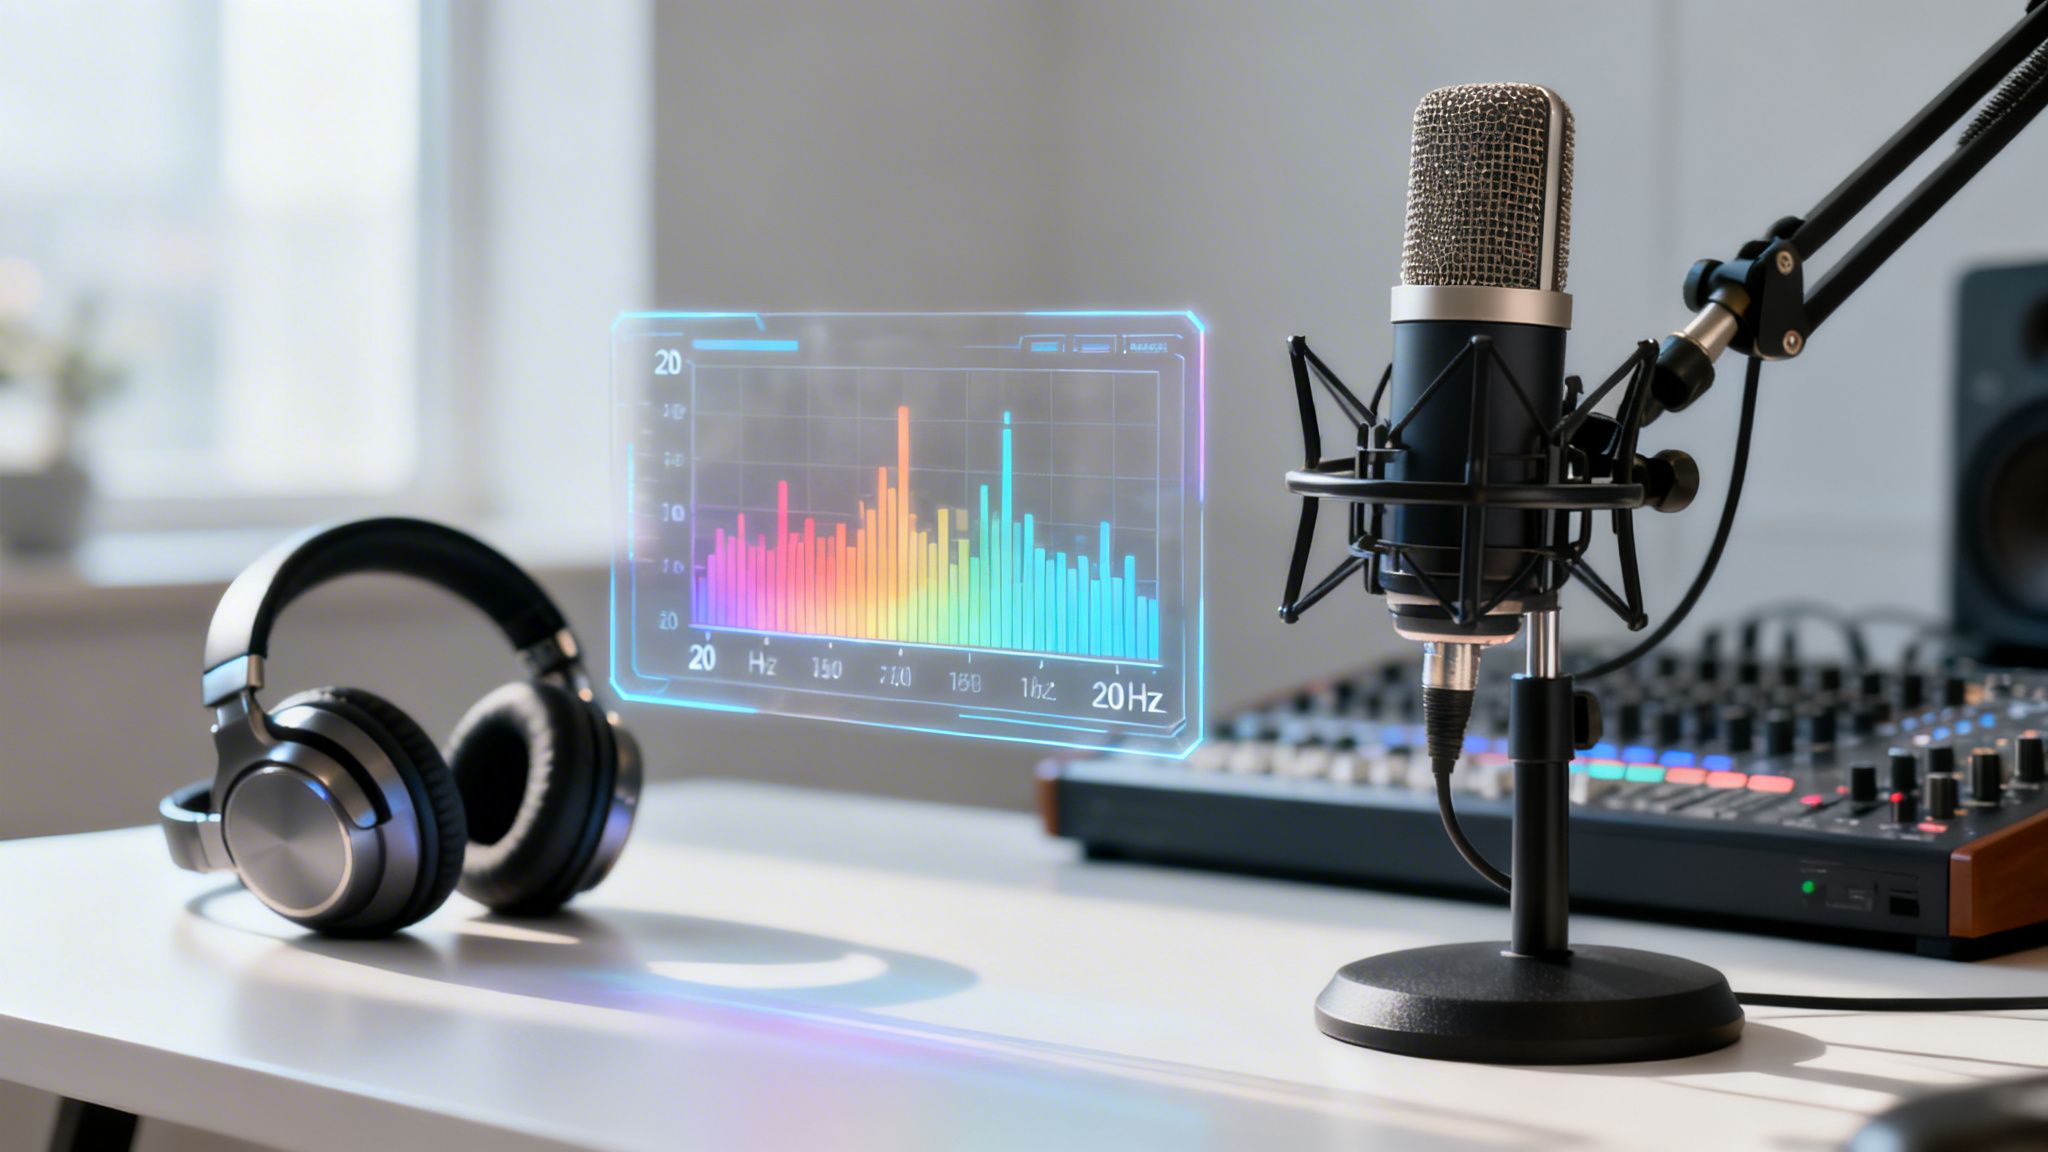
If you've ever felt lost turning knobs on an equalizer, you're not alone. A frequency EQ chart is the secret weapon for translating audio problems into targeted solutions. Think of it as a map of the entire human hearing spectrum, from 20 Hz to 20 kHz, with all the important landmarks for spoken word clearly marked.
For podcasters and video producers, this chart is your go-to guide for fixing common issues like muddiness, harshness, or a simple lack of clarity. It turns vague complaints like "it sounds boomy" into specific, actionable EQ adjustments.
Your Quick-Reference Frequency EQ Chart
Getting a handle on EQ is one of the fastest ways to make your audio sound polished and professional. Instead of guessing, a frequency chart gives you a clear path forward, helping you sculpt sound with intention.
This means you can stop wasting time and start working smarter. When you can quickly identify the frequency range causing an issue, you can make a precise cut or boost and move on. This guide is built to be that quick-reference tool you’ll want to keep open during every editing session.
Below is a breakdown of the most common vocal EQ issues and where to find them in the frequency spectrum.
As you can see, specific problems are tied to distinct frequency bands. This allows you to surgically remove what you don't want and enhance what you do. Here’s a more detailed table to guide your first moves.
Quick Reference Vocal EQ Adjustments
This table summarizes key vocal frequencies, the problems often found within them, and the standard EQ moves to correct them. Think of these as reliable starting points for cleaning up your dialogue.
Remember, every voice is different, so let your ears be the final judge. These ranges are powerful starting points, not rigid rules.
Understanding the Fundamentals of Audio Equalization
Before you can really put a frequency EQ chart to work, you need a solid grasp of what you're actually changing. In simple terms, equalization (or EQ) is the art of turning the volume up or down on specific frequencies within your audio. Think of it as a super-powered set of tone controls for the entire audible spectrum, from the deep rumbles at 20 Hz to the airy sizzle at 20 kHz.
The low frequencies give a voice its body and power. The high frequencies are all about clarity, detail, and that sense of "presence." Getting a feel for this relationship is the first real step toward making deliberate, professional-sounding EQ moves.
The Three Pillars of EQ
Every parametric equalizer—which is the kind you'll almost always be using—is built on three main controls. If you want to move past presets and start really shaping your sound, you have to know these inside and out.
- Frequency: This is the exact spot on the audio spectrum you want to adjust, measured in Hertz (Hz). Are you trying to tame a boomy sound around 150 Hz, or dial back some harshness up at 6,000 Hz? This control lets you choose your target.
- Gain: This is simply how much you boost (increase the volume) or cut (decrease the volume) of that frequency you’ve selected. It’s measured in decibels (dB). Positive numbers mean you’re boosting, and negative numbers mean you’re cutting.
- Q (or Bandwidth): This one controls how wide or narrow your adjustment is. A low Q value creates a broad, gentle slope that affects a wide range of surrounding frequencies—perfect for general tone shaping. A high Q creates a super-narrow, surgical spike for removing a very specific problem, like a nasty microphone ring or a persistent hum.
I like to think of it like painting. The frequency is where you put your brush on the canvas, the gain is how much paint you use, and the Q is the size of your brush tip.
The whole point is to make clean, purposeful adjustments. You're not just sliding faders around hoping for the best; you're solving specific problems and enhancing what’s already good in the audio. This level of precise control is a big part of what’s fueling the podcast surge in quality.
When you understand these three elements, a frequency chart stops being a set of rigid rules and becomes a map to guide your ears. You'll build the confidence to hear a problem, identify its frequency range, and apply the exact fix it needs, leading to much better audio, every single time.
A Detailed Frequency Guide for Spoken Word Audio
Okay, you've got the EQ controls down. Now it's time to move from theory to practical application. This is your band-by-band guide to equalizing the human voice, full of actionable starting points to get your podcast or video audio sounding clean and professional.
Think of this as the detailed map for your frequency EQ chart. The goal isn't to make a voice sound unnatural. It’s about surgically removing distracting sounds and gently bringing out its best qualities. With some ear training, you’ll be able to spot and fix common problems in no time.
Sub-Bass and Rumble (20-80 Hz)
When it comes to vocals, this lowest range is almost entirely noise. It’s where you’ll find the low-end hum from your air conditioner, vibrations traveling up the mic stand, and other junk you don't want.
Your first move should always be to get rid of it. Use a High-Pass Filter (HPF)—often called a low-cut—and set it right around 80 Hz. This one simple tweak instantly cleans up your audio and creates more headroom in your mix. It's a non-negotiable step for clear vocals.
The Mud and Boom Region (80-500 Hz)
We call the 250-500 Hz area the "mud" zone for a reason. Too much energy here makes a voice sound muffled and unclear, almost like the speaker is trapped in a cardboard box. Some of your most important EQ work will happen right here.
A broad, gentle cut somewhere in this range can work wonders for clarity. While deep rumble lives down at 30-40 Hz, the boominess that smothers a podcast voice is usually found between 200-500 Hz. You can learn more about these specific ranges in this excellent audio frequency bands chart.
Making a precise cut here is a key part of achieving professional audio. Research from industry sources suggests that well-equalized audio can significantly improve listener engagement and perceived professionalism, making it a critical skill for competitive content creation.
Nasal Tones and Presence (500 Hz - 5 kHz)
This is a wide band, and it’s where the main character and definition of the human voice live. But it's also home to some common problems.
- Nasal or "Honky" Tones (around 1 kHz): If a voice has that "talking through their nose" or telephone-like quality, a narrow, surgical cut somewhere around 1 kHz is usually the fix.
- Presence and Clarity (2-5 kHz): Our ears are naturally super-sensitive to this range, which makes it critical for intelligibility. A small, wide boost here can pull a voice forward and make it much clearer. Be careful, though—too much will sound harsh and wear your listeners out.
Sibilance and Air (5-20 kHz)
Finally, we have the high frequencies, which control the crispness and sparkle of your audio.
- Sibilance (5-8 kHz): This is where those sharp, piercing "s" and "t" sounds live. The best way to tame them is with a very targeted, narrow cut or a dedicated tool called a de-esser. This lets you reduce the harshness without making the whole track sound dull.
- Air (10-20 kHz): Want to add that final touch of professional polish? A gentle, wide boost using a high-shelf EQ above 10 kHz can add a sense of openness and detail often called "air." This should be a subtle, final touch. A little goes a long way.
How to EQ Music and Sound Effects in Your Mix
A truly professional production isn’t just about clean dialogue. It’s about how every single element—your voice, the background music, and any sound effects—sits together in the final mix. Getting this balance right is what separates the pros from the amateurs.
This isn't about just turning down the music. The real trick is a mixing technique called "carving space." Instead of killing the energy of your music track with the volume fader, you use EQ to strategically cut frequencies in the music that clash with the most important parts of the human voice. This lets your dialogue sit clearly on top, without you having to sacrifice the feel of the track underneath.
Creating Space for Dialogue
The sweet spot for vocal clarity and presence—what makes speech easy to understand—is almost always between 2 kHz and 5 kHz. If your music or sound effects are also busy in this exact range, your dialogue will sound muffled and get lost.
Here's an actionable workflow to fix it:
- Add an equalizer plugin to your music track.
- Make a gentle cut of about -3 dB to -6 dB, centering it somewhere between 2 kHz and 4 kHz.
- Be sure to use a wide Q setting. This makes the cut sound smooth and transparent, not like you've just scooped the life out of the music.
This one move creates a "pocket" in the frequency spectrum for your voice to sit in. Your audience won't even notice the EQ on the music, but they will immediately perceive your voice as being far more prominent and clear.
EQing Common Instruments and Effects
Beyond just getting the voice to sit right, it helps to know the general frequency zones for common instruments you might be working with. While you should always trust your ears, this frequency eq chart provides a great starting point.
The most valuable skill in mixing is using your perspective and craftsmanship to solve problems. It's an approach that embeds your character into the final product, resulting in a much richer soundscape than gear alone could ever provide.
Source: Stosh Tuszynski via Creative Field Recording.
- Acoustic Guitar: The string "pluck" and crisp definition often sit right in that 2-5 kHz vocal range. A small, targeted cut here can stop it from competing with your voice. The warmth and body of the guitar are much lower, around 150-300 Hz.
- Piano: A piano's main "body" is typically around 200-400 Hz. The "hammer" attack on the high notes, however, can easily poke into the 2-5 kHz range and start masking your dialogue.
- Synth Pads: These can be tricky because they often cover a massive frequency range. If a pad is washing out your voice, try a wide, gentle cut somewhere in the 1-4 kHz region to tuck it neatly behind the dialogue.
Remember, the goal isn't to make the music or effects sound bad. It’s all about making everything fit together. By using EQ to give each element its own distinct space, you’ll end up with a polished, professional-sounding mix where every part can be heard perfectly.
A Practical Workflow for Applying EQ to Your Audio
Having a solid frequency EQ chart is a great start, but turning that knowledge into professional-sounding audio is what really matters. For that, you need a methodical workflow. It’s the difference between guessing and getting clean, impactful audio every single time.
The industry-standard approach is simple: clean up the bad stuff before you try to enhance the good. We call this using subtractive EQ (cutting) before additive EQ (boosting). By carving out problematic frequencies first, you create a clean canvas. You’ll often find this reveals a natural clarity, meaning you need fewer aggressive boosts later on.
The Four-Step EQ Process
This workflow is a logical sequence that just plain works for spoken-word audio. Follow these steps in order, and you’ll get cleaner, more consistent results on every project. It's an approach many creators find essential for building effective podcasts for their business.
- Start with a High-Pass Filter (HPF): Before you touch anything else, roll off the low-end mud. Apply a high-pass filter and set it somewhere between 80-100 Hz. This one move instantly removes distracting low-frequency rumble from desk vibrations, mic stand bumps, electrical hum, or air conditioners. It’s the fastest way to improve vocal clarity.
- Sweep and Destroy Problem Frequencies: Now it’s time to hunt down any harshness or mud. Grab a parametric EQ and create a band with a very narrow Q (high Q) and a big boost of +10 dB or more. Slowly “sweep” this sharp peak across the spectrum, focusing on the 150 Hz to 5 kHz range. Listen for any frequency that jumps out or sounds especially nasty. When you find one, that's your target. Just apply a narrow cut right at that spot to surgically remove it without thinning out the rest of the audio.
- Enhance with Gentle Boosts: With the junk cleared out, you can now add some character. Using a wide, gentle boost (low Q) of just 1-3 dB is all you usually need. A common move is a slight lift around 2-4 kHz to add presence and intelligibility, or a high-shelf boost above 10 kHz to introduce some "air" and sparkle.
- Tame Sibilance Last: Finally, let’s polish it up by addressing any harsh "s" or "t" sounds (sibilance). The best tool for the job is a dedicated de-esser, but a very narrow, dynamic EQ cut in the 5-8 kHz range can also work wonders. This final touch makes the audio crisp and clear without being fatiguing for your audience to listen to.
Once you internalize this workflow, you can confidently tackle any vocal recording. It empowers you to make informed decisions that will consistently elevate the quality of your productions.
Frequently Asked Questions About Audio EQ
EQ can feel like a dark art when you're starting out, but it all comes down to a few core principles. Let's clear up the most common questions creators have so you can start EQing with confidence and get that professional sound.
Getting these fundamentals down is the key to mastering your audio and making any frequency eq chart work for you.
What Is the Difference Between a Graphic and Parametric EQ?
Think of a graphic EQ as the simpler tool in the box. It gives you a set of sliders fixed at specific frequencies. You can only boost or cut those pre-set bands, making it great for quick, broad adjustments to the overall tone.
A parametric EQ, on the other hand, is your surgical tool. It gives you precise control over three key things: the exact frequency you want to change, the gain (how much you boost or cut), and the Q (the bandwidth, or how narrow or wide your adjustment is). For detailed work like cleaning up a voice, a parametric EQ is always the better choice. It lets you surgically remove problem sounds without messing up the audio around them.
Should I Boost or Cut Frequencies First?
Always cut first. This is a foundational principle of professional audio mixing, and for good reason. Your first step should always be using subtractive EQ to clean up the signal.
By carving out problematic frequencies—like muddy tones around 250-500 Hz or a harsh, tinny ring at 3 kHz—you often find that the natural clarity of the voice was there all along, just buried. Boosting adds energy and can introduce noise, so think of it as the final, subtle polish you apply after the cleanup is done. For anyone just starting their show, this approach is a game-changer. You can find more practical tips like this in our guide to coming up with great podcast name ideas.
What Is a High-Pass Filter and When Should I Use It?
A High-Pass Filter (HPF), often called a low-cut, is one of the most powerful tools in your EQ arsenal. It simply cuts out all audio information below a specific frequency you set. For any vocal recording, this should be your very first EQ move.
Set an HPF somewhere between 80-100 Hz to instantly get rid of all that low-end junk you can’t even hear but that muddies up your mix. We’re talking about mic stand rumble, desk bumps, air conditioner hum, and electrical noise. This one simple move makes a huge difference in vocal clarity and frees up a surprising amount of headroom in your mix.
How Do I Find the Right Frequencies to Adjust?
Finding the right frequency is part listening, part detective work with a spectral analyzer. Luckily, most modern EQ plugins have a built-in analyzer that shows you a real-time graph of your audio's frequency content.
The most valuable skill in mixing is using your perspective and craftsmanship to solve problems. It's an approach that embeds your character into the final product, resulting in a much richer soundscape than gear alone could ever provide.
Source: Stosh Tuszynski via Creative Field Recording.
To hunt down a problem, use the "sweep" technique. Create an EQ point with a narrow Q (a sharp, pointy curve) and a big gain boost. Then, slowly drag that point across the frequency spectrum. When a nasty sound (like a resonant hum, boxiness, or a piercing ring) suddenly jumps out and gets much louder, you've found your culprit. Now you know the exact frequency that needs a cut.
Tired of wrestling with EQs and mixing boards? The team at micDrop provides end-to-end podcast and video production, handling all the technical details so you can focus on creating great content. From guided recording and professional editing to sound design and distribution, we elevate your brand's story with polished, scalable shows. Find out how we can remove your production headaches at https://www.micdrop.cc.


